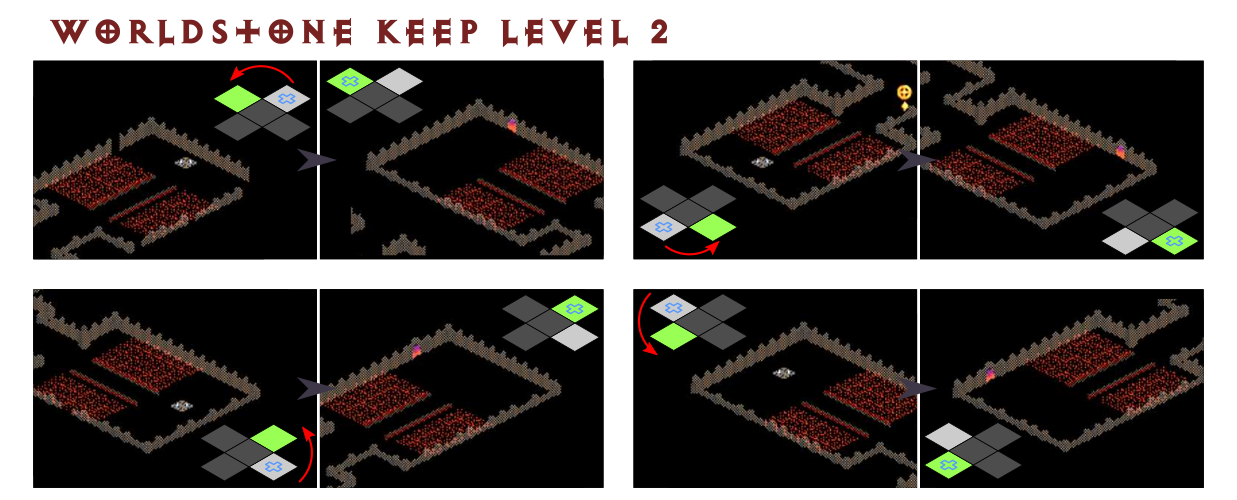
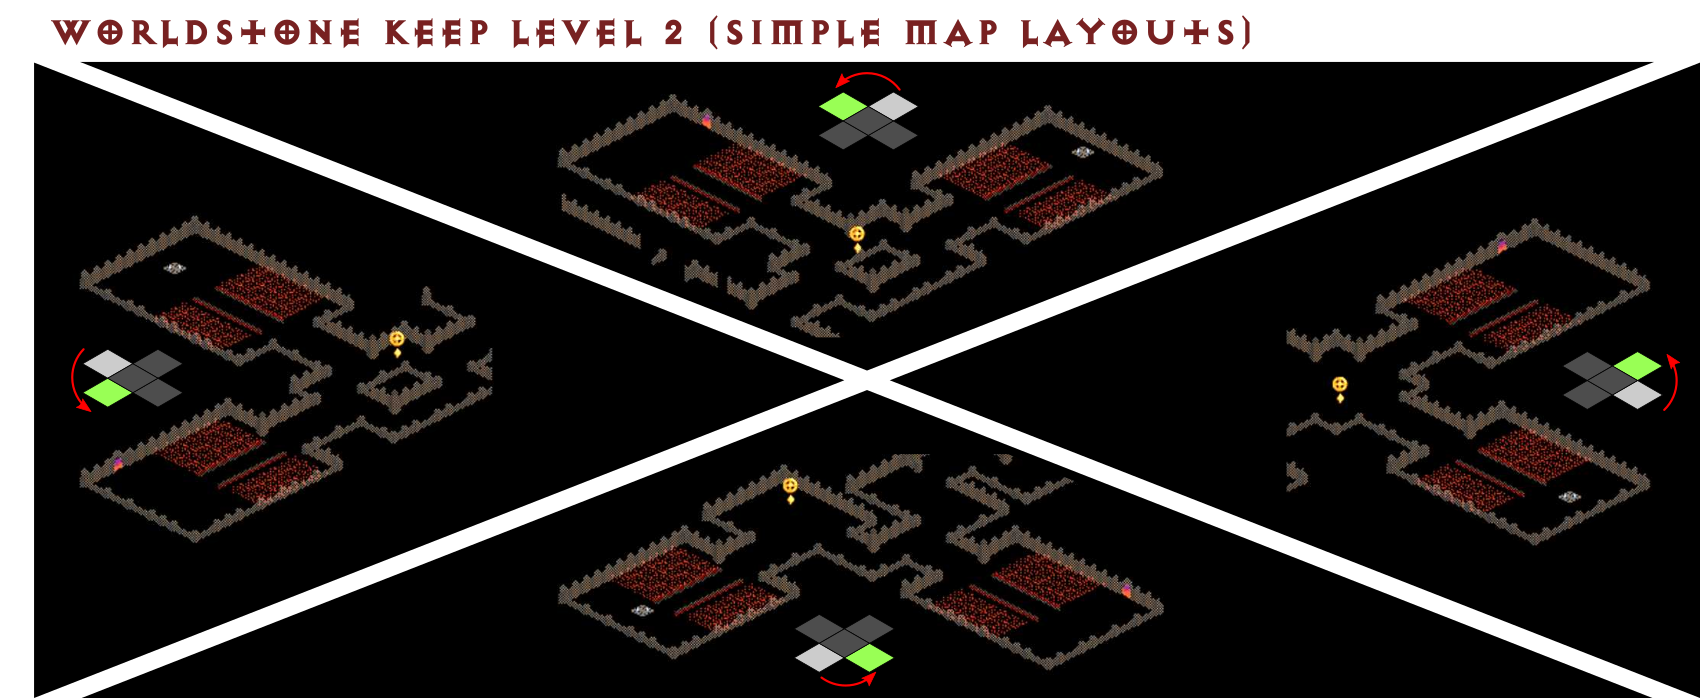
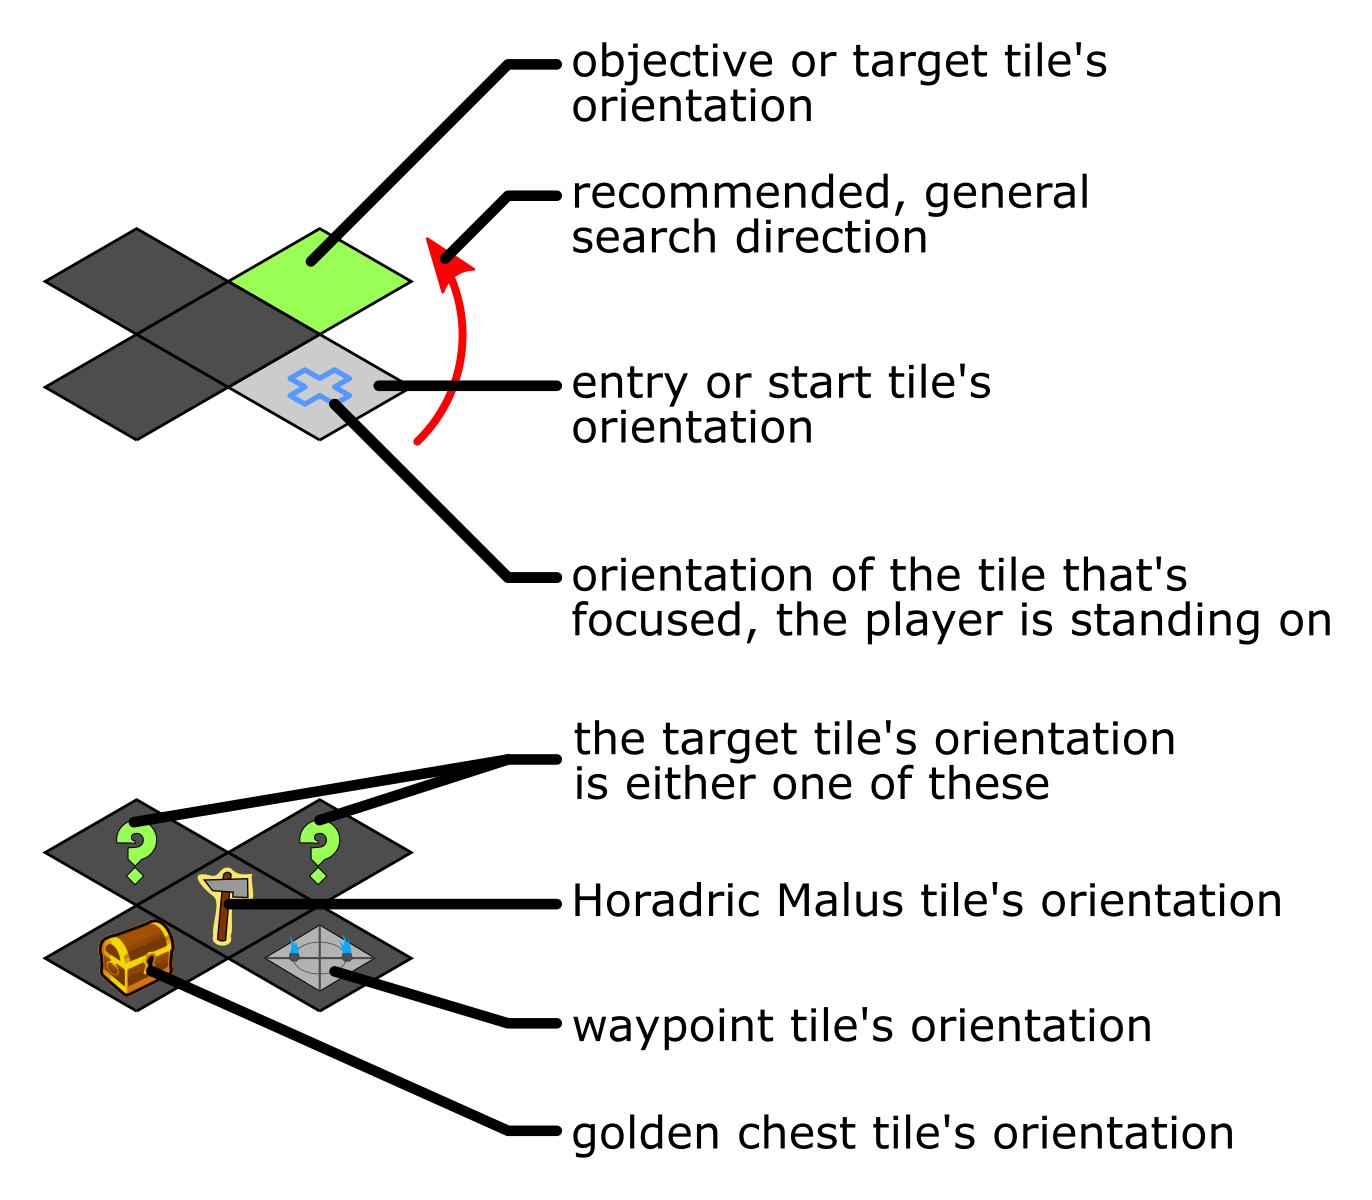
The first thing you want to do is rid yourself of the idea that maps in Diablo II are completely randomly generated because in many zones there exist consistent patterns. You can use these patterns to find the exit or a given objective much faster than by plain trial and error.Let me define some terms and concepts before I go through every zone needed to complete a whole difficulty and explain the patterns and show the instructions you can follow:Indoor maps are generated using tiles. Tiles are like jigsaw pieces in the sense that they have 1 to 3 (4) connections to other tiles, together they constitute a map. You probably have noticed some rooms always look the same with one, two or three doorways. Tiles have one out of four orientations: top left, top right, bottom left, bottom right. To have an example let us have a look at some simple maps for the Worldstone Keep Level 2: Taking the top part as an example, you see that the only way off the waypoint is by going down and left which means the waypoint map tile is oriented to the top right (also shown by the light gray colored tile). The exit tile on the other hand has a top left orientation (shown in light green). The relation between waypoint tile and exit tile orientation is always the same as you can see in the other examples. So whenever you enter Worldstone Keep Level 2 via the waypoint you generally want to explore the edge of the map in a counter-clockwise fashion to find the exit to Worldstone Keep Level 3 (as indicated by the red arrow).The cross tile symbol will help you to identify tile orientation and direction of movement in every indoor map screenshot: Outdoor maps have a more random nature and don't follow the same patterns as indoor maps do. Nevertheless there are some general rules and specific details you can use to your advantage. Act I, II and III are introduced with tips and tricks on their respective outdoor maps.
Outdoor Maps Act I, Don't Stray from the Path
It is kind of obvious but still worth mentioning: Outdoor maps in Act I are connected by roads. Therefore you generally want to follow the road to get to the next zone as fast as possible. Keep in mind that every outdoor map in Act I has a cave entrance of some sort which is also connected to the road (Blood Moor: Den of Evil, Cold Plains: Cave, Stony Field and Dark Wood: Underground Passage, Black Marsh: Hole, Tamoe Highland: Pit). Also you want to stay near the road and not directly ON the road in order to find waypoints, shrines, champions and unique monsters with minions to kill for experience or other points of interest (most important being the Forgotten Tower).
Blood Moor
More often than not the Den of Evil is right outside the Rogue Encampment or easy enough to spot forking off the main road. Drop a Town Portal at the fork or the cave entrance and head to the Cold Plains waypoint first (which is always beyond rogue scout Flavie right when you enter the Cold Plains). This way you save the walk out of the Den of Evil after completion.
Den of Evil
Although not necessary to complete the first Act, I recommend doing the Den of Evil for the skill point quest reward and to stock up on some early gold for potions and tomes. It is not too relevant since you have to kill all monsters in here for the quest but the Den of Evil has an underlying pattern for the map generation: For example if the entry tile is in the bottom left then Corpsefire the super unique will spawn on a tile which is facing to the top left. The entrance and exit tiles used are the same as for the Underground Passage Level 1.
Cold Plains
The Cold Plains lead to two new outdoor zones: the Burial Ground you want to avoid and the Stony Field you need to go through in order to progress. If you imagine the Cold Plains map as a square or rectangle the passage to the Burial Ground will always be close to a corner and the passage to the Stony Field will usually be in the center of one of its sides. You can also explore a bit around the entrance of the Cold Plains to know which corner you are in.On Hell difficulty you cannot use any teleport skill in the Cold Plains (Teleport, Blood Warp, Blink, Gust,...) since it is disabled to allow melee characters to farm Terror Keys by killing Bloodraven.
Stony Field
In the Stony Field you are mostly looking for the Underground Passage Level 1 which connects to the Dark Wood. The entrance is either on the edge of the map (if there is a cliff) or somewhere on the inside (then it looks just like the Den of Evil entrance).If you plan on rescuing Cain or doing Cows later you might want to grab the waypoint or make a Town Portal at the cairns. Note that the cairn formation is almost always somewhere near the road (another reason to follow it loosely) whereas the waypoint can be anywhere close to a border. Outdoor waypoints in Act I and II are sometimes easy to spot due to the fact that there are torches on either side.
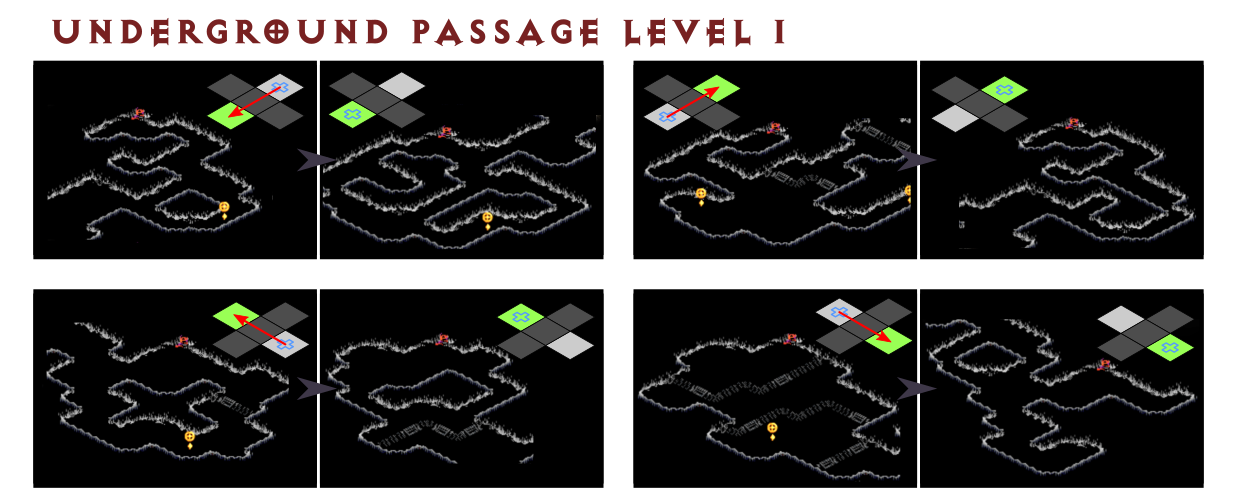
Underground Passage Level 1
The Underground Passage Level 1 is the first indoor map and has a reliable pattern you can use to find the exit to the Dark Wood faster:Following this you generally want to explore the Underground Passage Level 1 in a straight line from your entry tile since the exit will always have an orientation opposite to that.You don't want to go in the direction of red Fallen if you see them since it will always be a dead end (voodoo camp with totems and dead rogues).
Dark Wood
You will leave the Underground Passage through the cliff or through a hole in the field. As usual, follow the road to reach the Black Marsh. Consider picking up the waypoint and / or the Scroll of Inifuss for Cain quest.
Black Marsh
If you plan on running Countess a few times for Stealth runeword (TalEth in Armor) you want to find the waypoint here. Both the Tower and the waypoint are usually near the edge of the map or more rarely at some of the inner boundary.Since every Tower Cellar Level has at least one unique monster I would recommend running it at least once. Consider dropping a Town Portal at the Tower and going for the Outer Cloister waypoint.
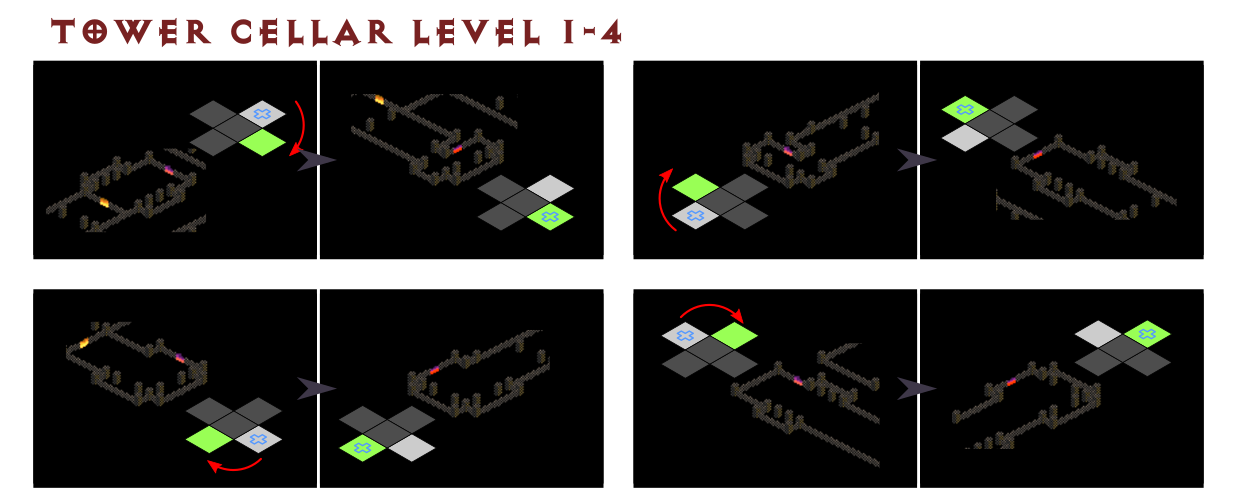
Tower Cellar Level 1-4
All the Tower Cellar Levels have the same consistent pattern you can follow to find the next level faster: You generally want to explore the Tower Cellar Levels 1-4 in a clockwise fashion.
Tower Cellar Level 5
The last level of the Forgotten Tower is home to the Countess and always has the same layout.
Tamoe Highland
The Tamoe Highland always ends with the Monastery Gate in the top right. Adjust your direction depending on where you enter the Tamoe Highland and don't rely too much on the road (because of the Pit).
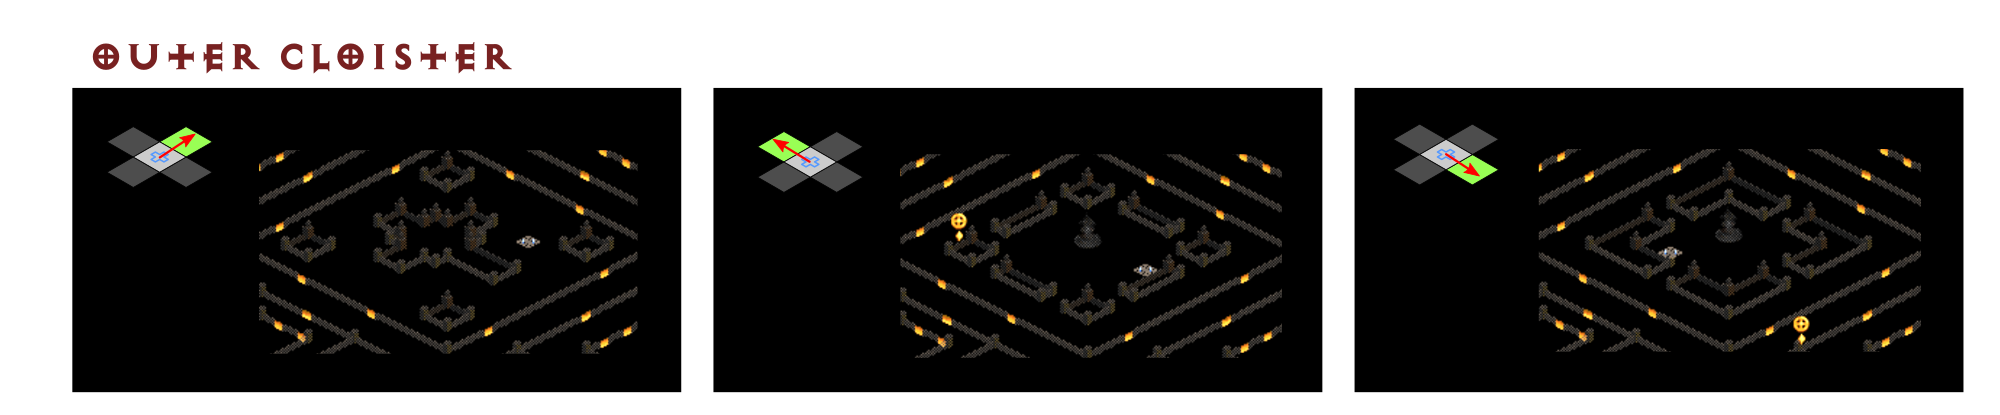
Outer Cloister
Once you pass the Monastery Gate you enter the Outer Cloister. You can choose between three ways to find the Barracks: top left, top right or bottom right (bottom left is where we came from). There is a very easy way to tell which way is the one leading you into the Barracks:If you have bushes in the middle and the waypoint is at the top right: go towards the top right. If there is a statue in the middle and the waypoint to the right of it: go towards the top left. If there is a statue in the middle and the waypoint is left / in front of it: go towards the bottom right.
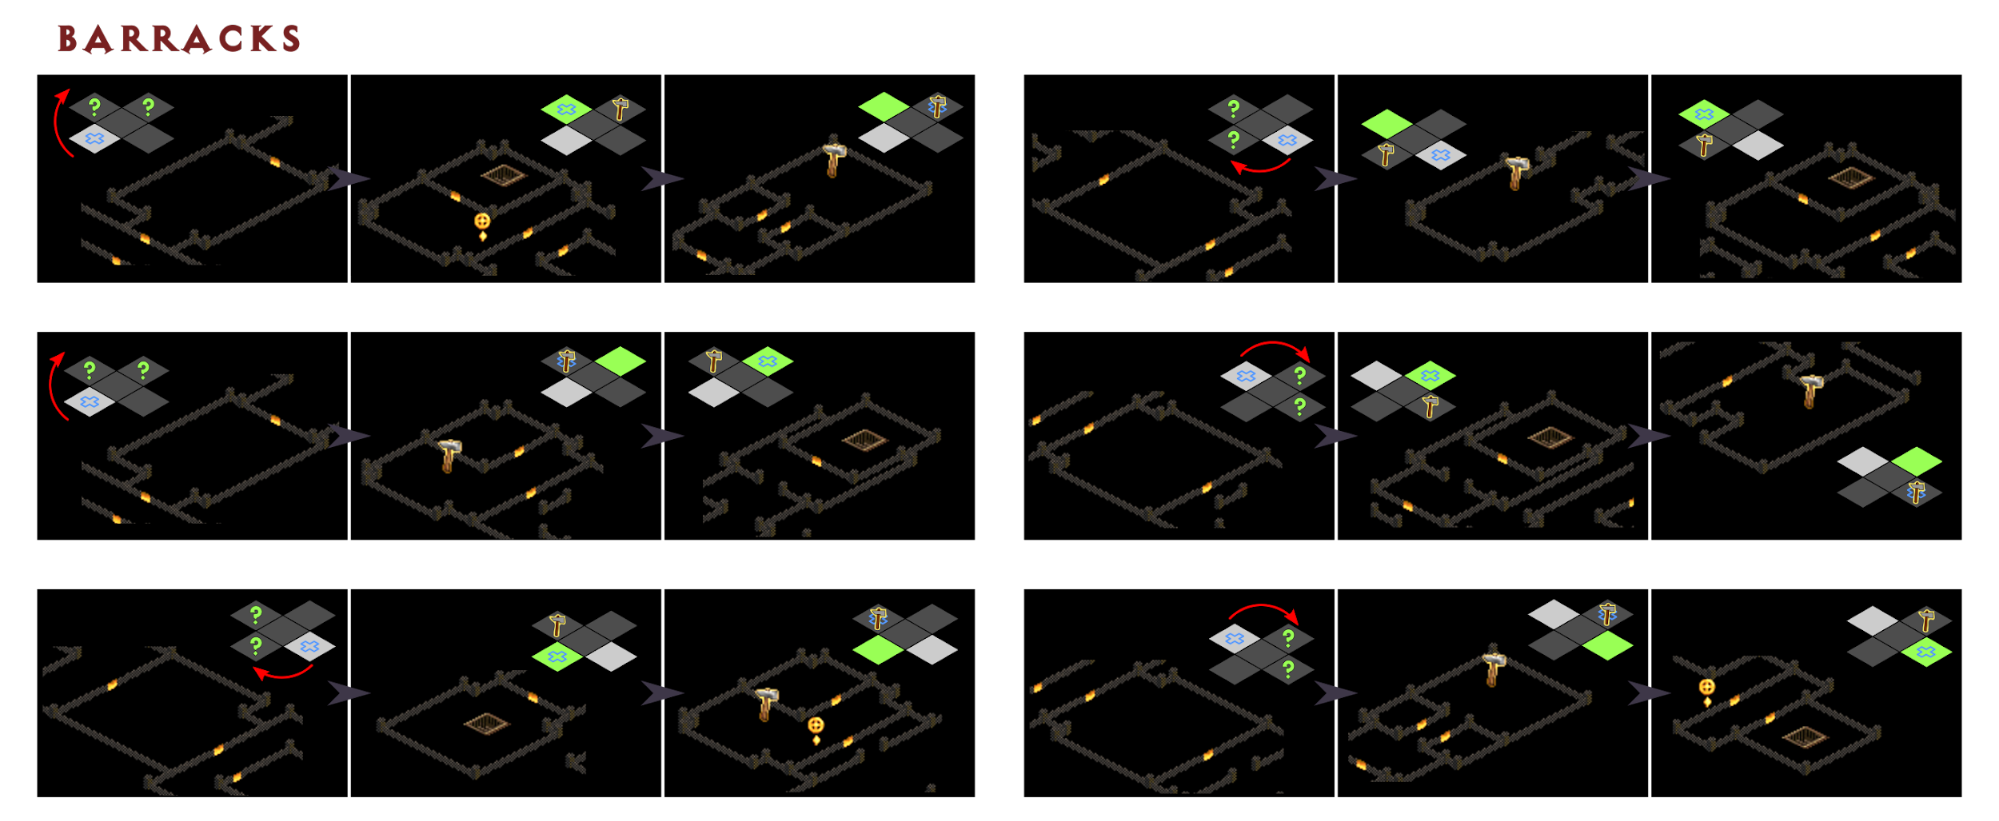
Barracks
The Barracks have a reliable pattern you can follow to find the entrance to the Jail faster: The exit tile to Jail Level 1 is either oriented to the left of the tile you entered the barracks on OR it has the opposite orientation. This means you generally want to explore the Barracks in a clockwise fashion. If you find the Horadric Malus (for the Tools of Trade quest) first you can conclude the exact orientation of the exit tile.
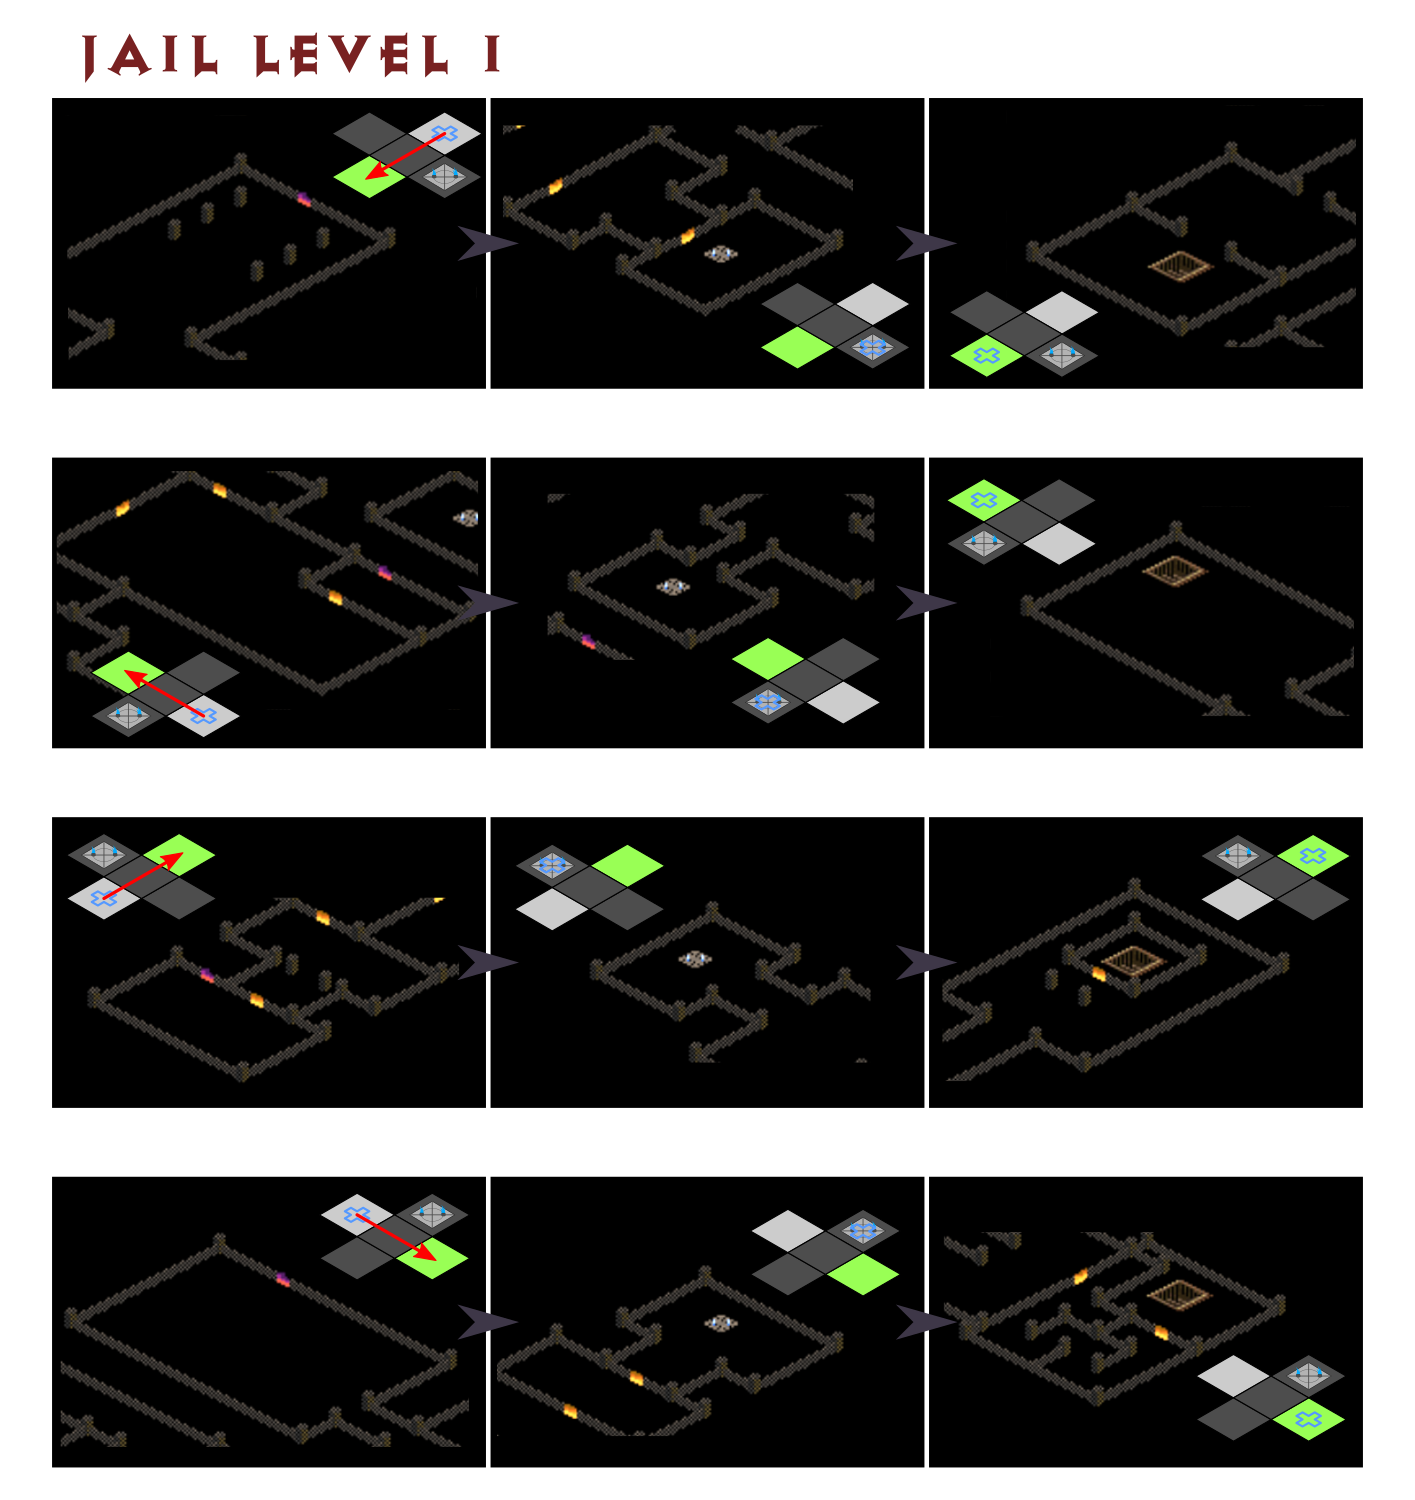
Jail Level 1
The Jail Level 1 has a reliable pattern you can follow to find the exit faster:You generally want to explore the Jail Level 1 in a straight line from your entry tile since the exit will always have an orientation opposite to that.Note that the waypoint can generally be found by exploring this map in a clockwise fashion.
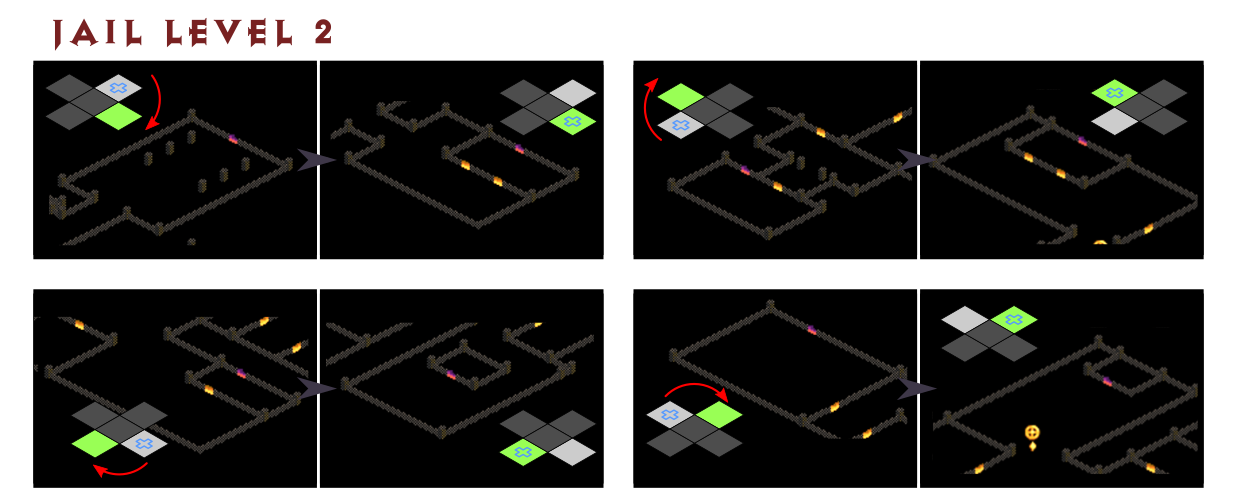
Jail Level 2
The Jail Level 1 has a reliable pattern you can follow. Just like Level1 you generally want to explore the Jail Level 1 in a straight line from your entry tile since the exit will always have an orientation opposite to that. If you explore the map in clockwise fashion you will find the superunique Pitspawn Fouldog (he takes the place of the waypoint in Level 2 if you will).
Jail Level 3
The Jail Level 2 has a reliable pattern you can follow as well: You generally want to explore the Jail Level 2 in a clockwise fashion to find the Inner Cloister faster.
Inner Cloister & Cathedral
The Inner Cloister and adjacent Cathedral always have the same layout. The entrance to the Catacombs can be found in the right wing in the back.
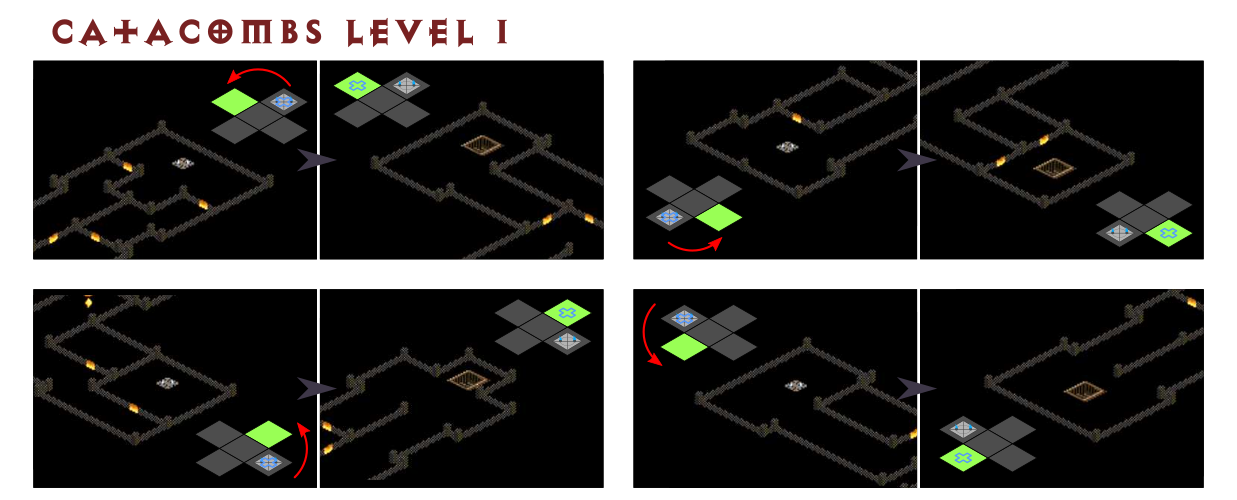
Catacombs Level 1
Catacombs Level 1 has no reliable pattern I am aware of. The best way to approach these kinds of zones is to explore as fast as possible. It helps to know some of the dead end tiles.
Catacombs Level 2
Catacombs Level 2 has no reliable pattern I am aware of. Once again it helps to know the dead end tiles and also the possible exit tile's appearances. If you find the waypoint before the exit to Level 3 however you can conclude the exit tiles orientation as follows: From the waypoint you generally want to explore the Catacombs Level 1 in a counter-clockwise fashion to find the exit to Catacombs Level 2.Consider setting up a Town Portal when you enter Level 1 in case you find the waypoint first and want to get back there.
Catacombs Level 3
Catacombs Level 3 has no reliable pattern I am aware of.
Catacombs Level 4
Catacombs Level 4 always has the same layout. Kill Andariel and proceed to Act II.
Outdoor Maps Act II, Know your Square
Every outdoor map in Act II (Rocky Wastes, Dry Hills, Far Oasis, Lost City) is shaped like a square or rectangle and the exits or passages to the next zone are always located in one of these corner positions: It's very important to notice that when there is no exit to either side of the corner there will not be a full-fledged corner but instead some form of indent. Consequently, if you see a full-fledged corner using the full external dimensions of the square (shown in green) you are sure to find the passage to the next zone there.Keeping this in mind and being able to estimate the size of the square (as a rule of thumb: the Dry Hills / Far Oasis / Lost City square fills the whole screen with full screen automap enabled) you can quickly rule out corners by spotting indents.Save the Rocky Wastes, the maps are divided by a cliff with (at least?) one set of stairs to cross. It might be wise to avoid the cliff or if you have to cross it plan accordingly, so you don't have to cross multiple times.
Sewers Level 1
The Act II Sewers are only needed if you want to get the skill quest reward for killing Radament. You can enter it in Lut Gholein either through a trap door near the Mercenary guy Greiz or through a doorway at the docks. It is usually better to enter through the door at the docks and explore to the left and right of that entrance.Inside the Sewers Level 1 here is no reliable pattern I am aware of. The orientation of the entrances is always the same but the exit tile to Level 2 can have any orientation.The exit tile however seems to be mostly near the dock entrance (explore a bit in both clockwise and counter-clockwise direction and you will probably find it).
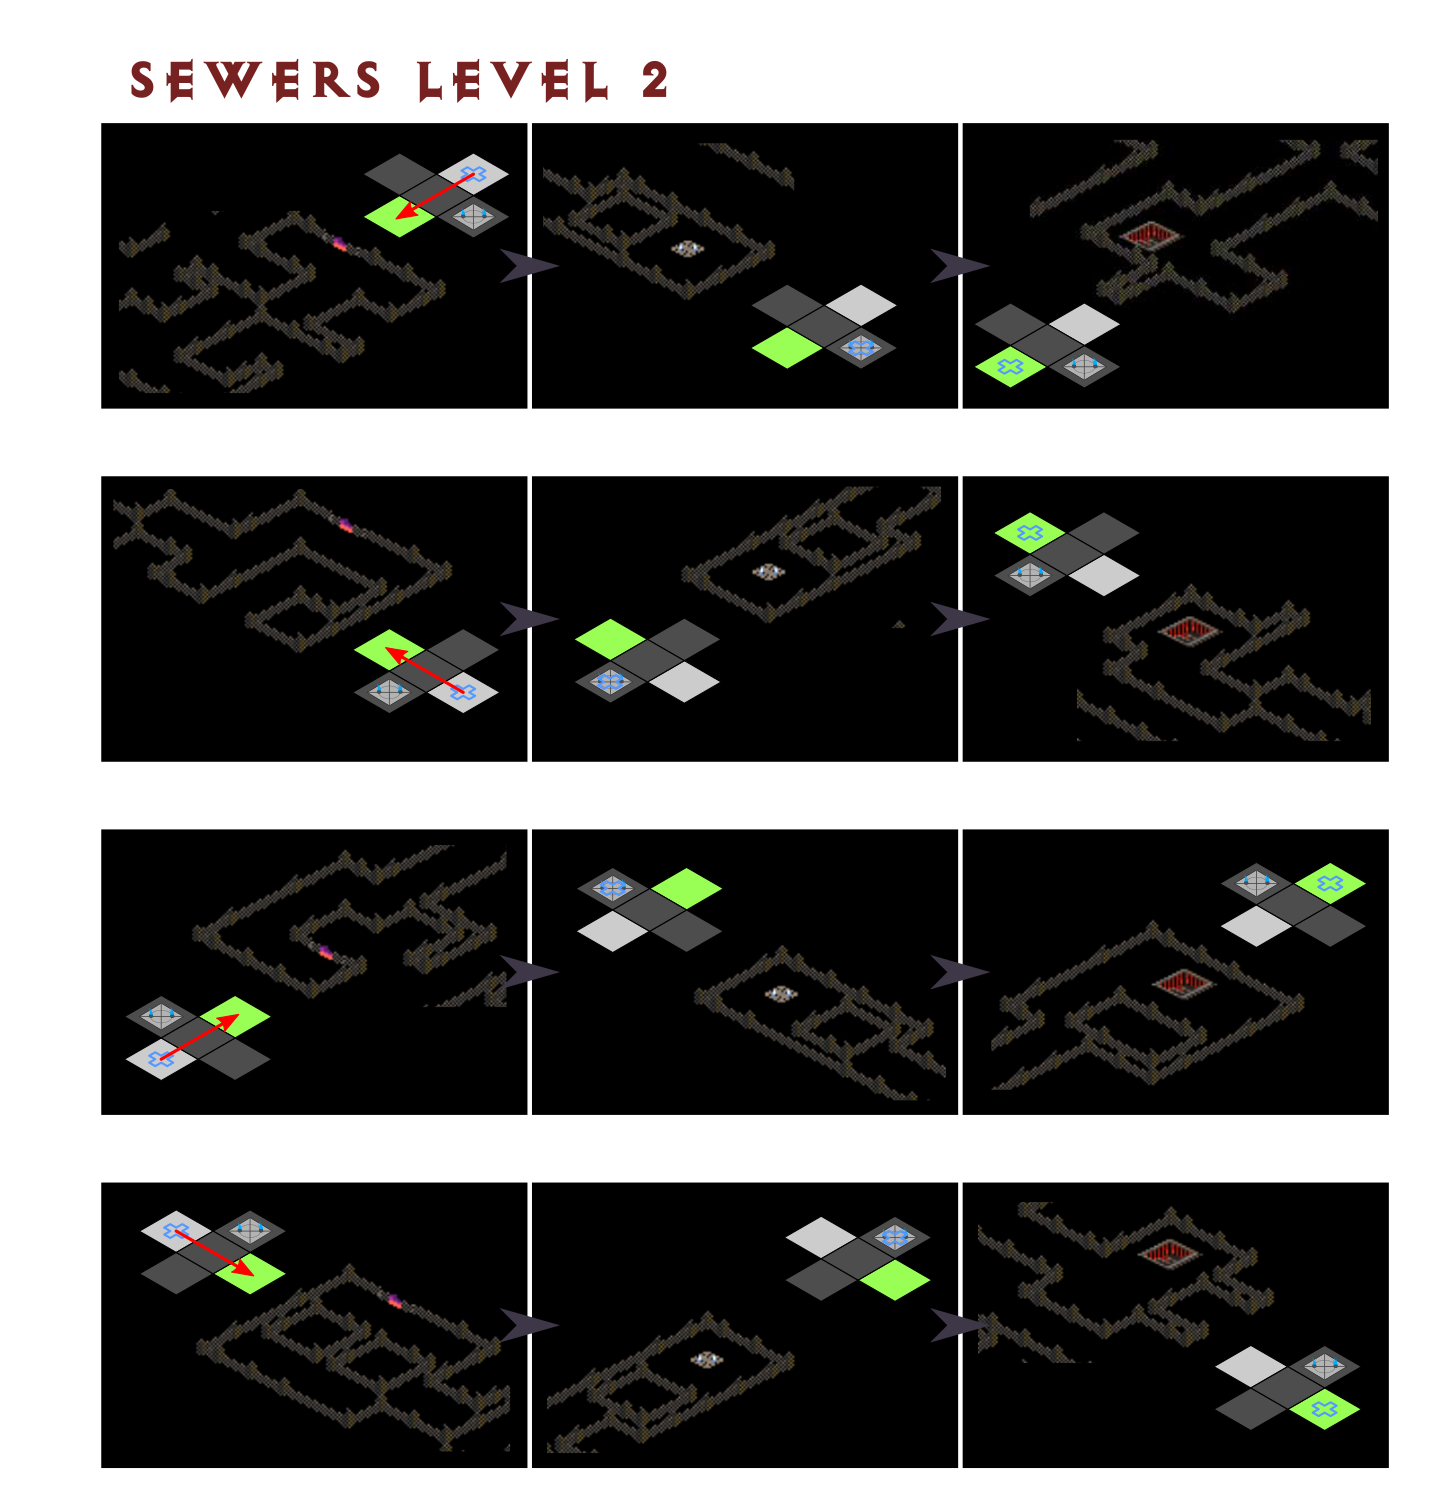
Sewers Level 2
The Sewers Level 2 has a reliable pattern you can follow to find the exit to Level 3 faster:You generally want to explore the Sewers Level 2 in a straight fashion. The waypoint can be found going clockwise from the entry tile.
Sewers Level 3
The Sewers Level 3 has a reliable pattern you can follow to find Radament faster:You generally want to explore the Sewers Level 3 in a clockwise fashion.
Rocky Wastes
You want to pass through the Rocky Wastes as fast as possible. If you are leaving Lut Gholein in top left direction there can be a close position exit to the Dry Hills to the top right and if Lut Gholein is left through the top right there can be a close position exit to the Dry Hills to the top left.
Dry Hills
Find the exit to the next outdoor zone as usual but keep an eye out for the Halls of the Dead. Just like waypoints in Act II and the Maggot Lair in Far Oasis, the Halls of the Dead can be anywhere close to the red rocks on the map. If you find the Halls of the Dead drop a Town Portal before heading down there and find the next waypoint (can be Dry Hills or Far Oasis).
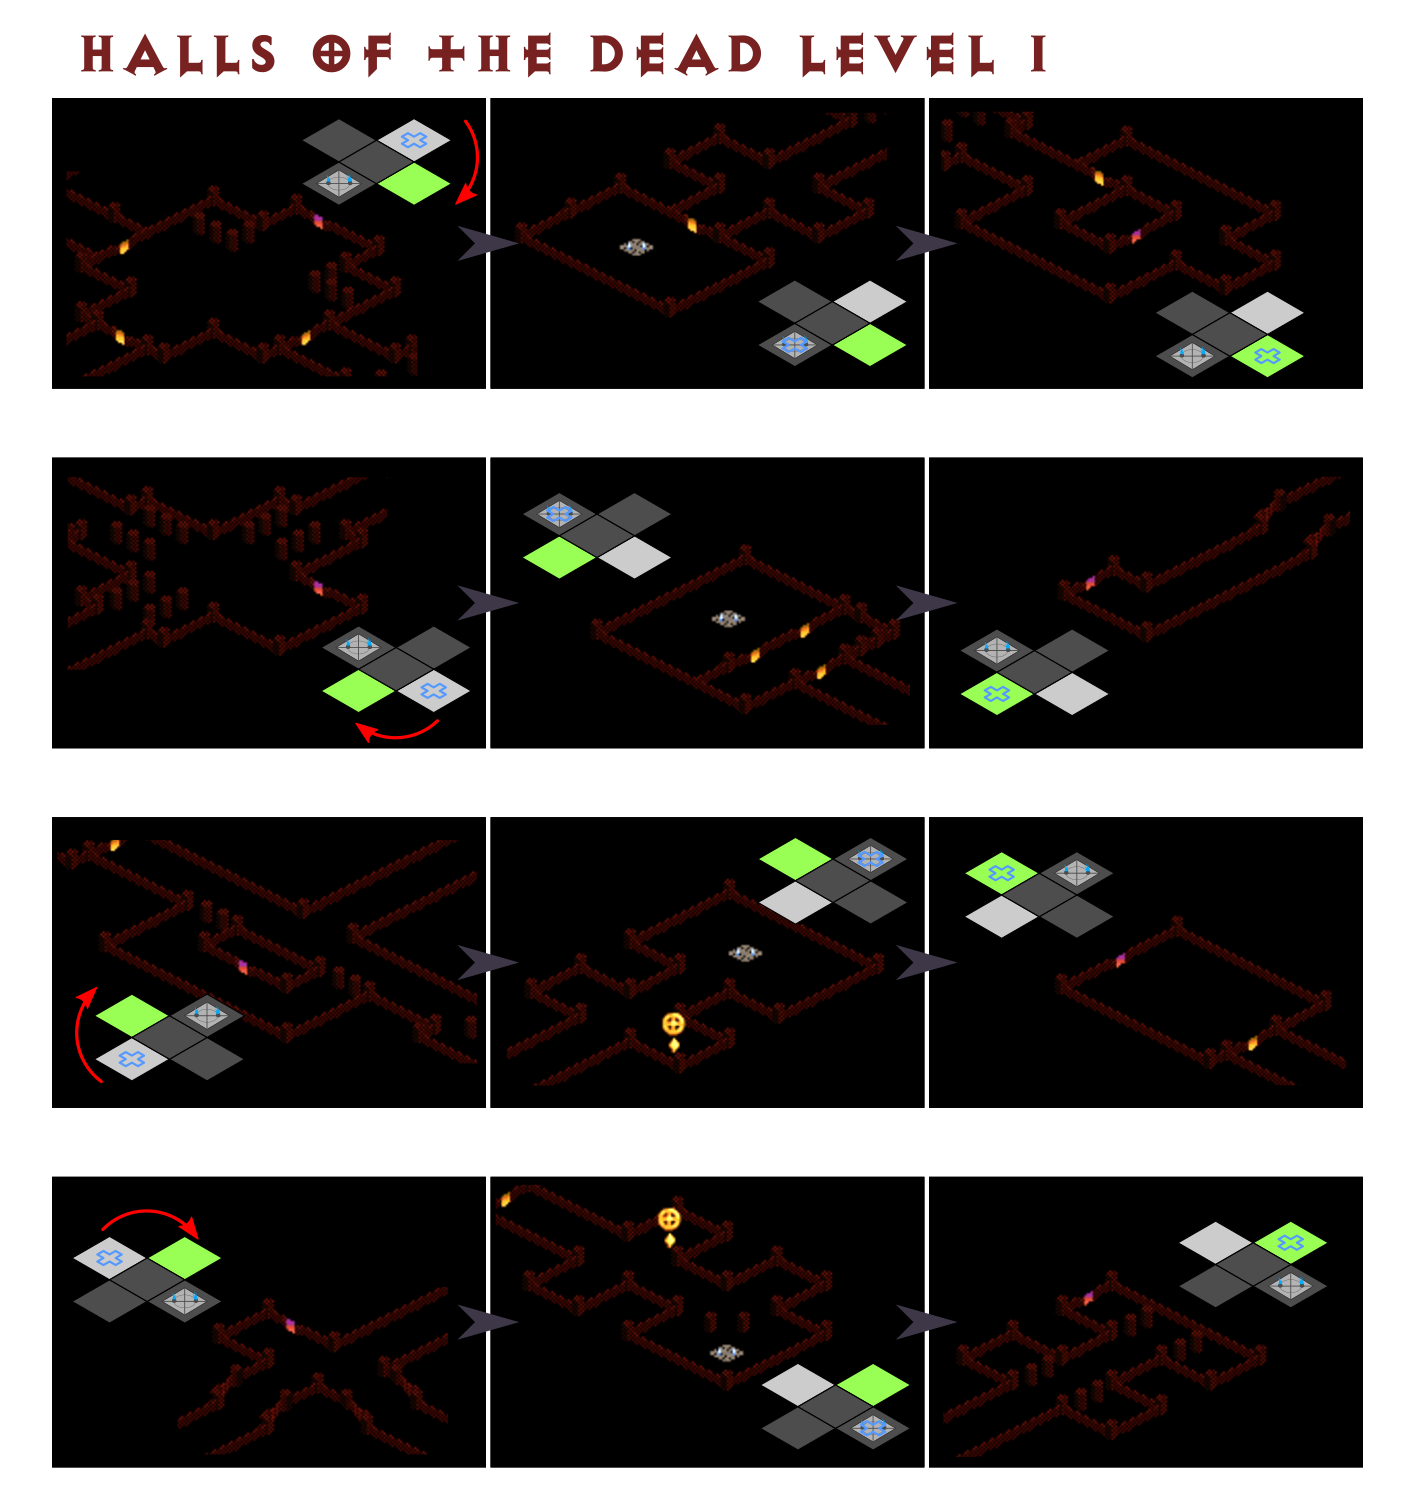
Halls of the Dead Level 1
The Halls of the Dead Level 1 has a reliable pattern you can follow to find the exit to Level 2 faster:You generally want to explore the Halls of the Dead Level 1 in a clockwise fashion. The waypoint is usually skipped but can be found going straight from the entry tile.
Halls of the Dead Level 2
The Halls of the Dead Level 2 has a reliable pattern you can follow to find the exit to Level 3 faster. Note that on Hell difficulty you cannot use any teleport skill (Teleport, Blood Warp, Blink, Gust,...) on Level 2 and 3 since it is disabled to allow melee characters to farm Hate Keys by killing Bloodwitch the Wild on Level 3 (Superunique guarding the golden chest).You generally want to explore the Halls of the Dead Level 2 in a clockwise fashion.
Halls of the Dead Level 3
The Halls of the Dead Level 3 has a reliable pattern you can follow to find the chest containing the Horadric Cube faster:You generally want to explore the Halls of the Dead Level 3 in a clockwise fashion.
Far Oasis
Look for the Maggot Lair entrance and drop a Town Portal before you head down (or at least if you didn't just discover the waypoint close to it) and try to find the Lost City waypoint first.
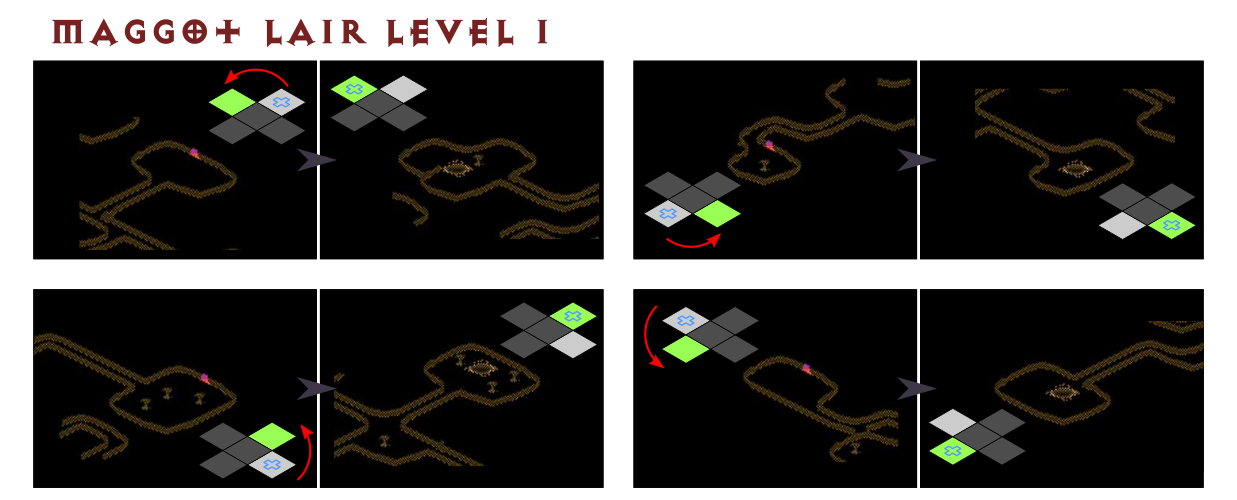
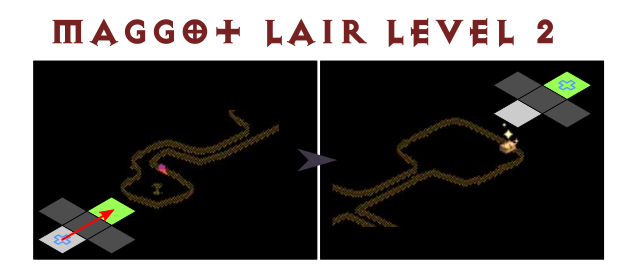
Maggot Lair Level 1 and 2
Maggot Lair Level 1 has a reliable pattern you can follow to find the exit to Level 2 and Level 3 faster:You generally want to explore the Maggot Lair Level 1 and Maggot Lair Level 2 in a counter-clockwise fashion.
Maggot Lair Level 3
Maggot Lair Level 3 is special since both the entry tile and the objective tile (with the chest that holds the Staff of Kings) always have the exact opposite orientation: Since the entry tile is oriented to the bottom left and the objective tile to the top right you generally want to explore the Maggot Lair Level 3 in a straight fashion towards the top right corner. Get the Staff of Kings from the chest.
Lost City
In contrast to the other zones the exit to the Valley of Snakes can be in a close position like that:Also the passage leading to the Valley of Snakes cannot be in the lower corner of the imagined rectangular. This means you want to look for the exit in the left, top and right corner of the Lost City. Other than that the same principles of outdoor maps Act II apply here too.
Valley of Snakes
Valley of Snakes always has a very similar layout with the entrance to the viper temple in the middle.
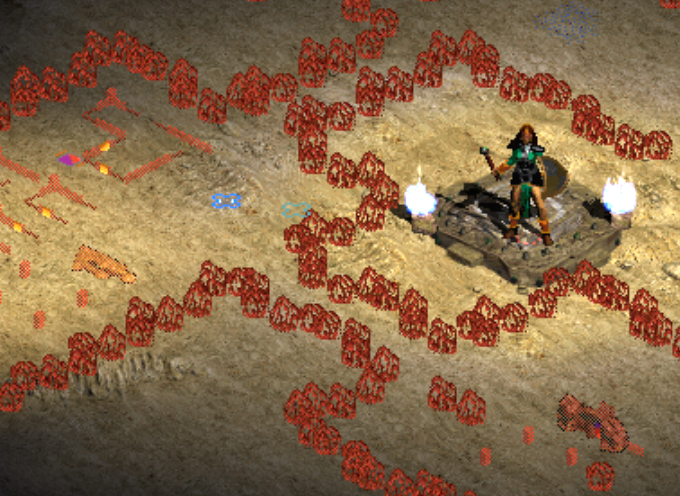
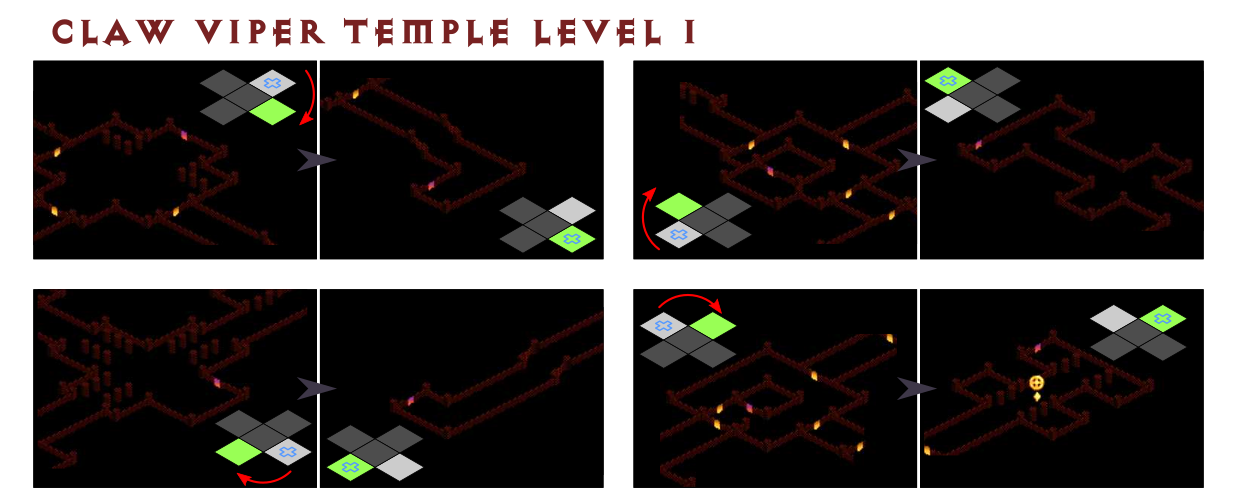
Claw Viper Temple Level 1
Claw Viper Temple Level 1 has a reliable pattern you can follow to find the exit to Level 2 faster: You generally want to explore the Claw Viper Temple Level 1 in a clockwise fashion.
Claw Viper Temple Level 2
The Claw Viper Temple Level 2 is a very small map with the same layout every time. You should have no trouble finding the Amulet of the Viper to forge The Horadric Staff. Remember to talk to Drognan to enter the palace.
Harem & Palace Cellar
The Harem and Palace Cellar Levels always have a similar layout. From Harem Level 2 on the maps are squares and each corner has an exit which goes either down or up a level. You generally want to avoid going in diagonals on this square.
Arcane Sanctuary
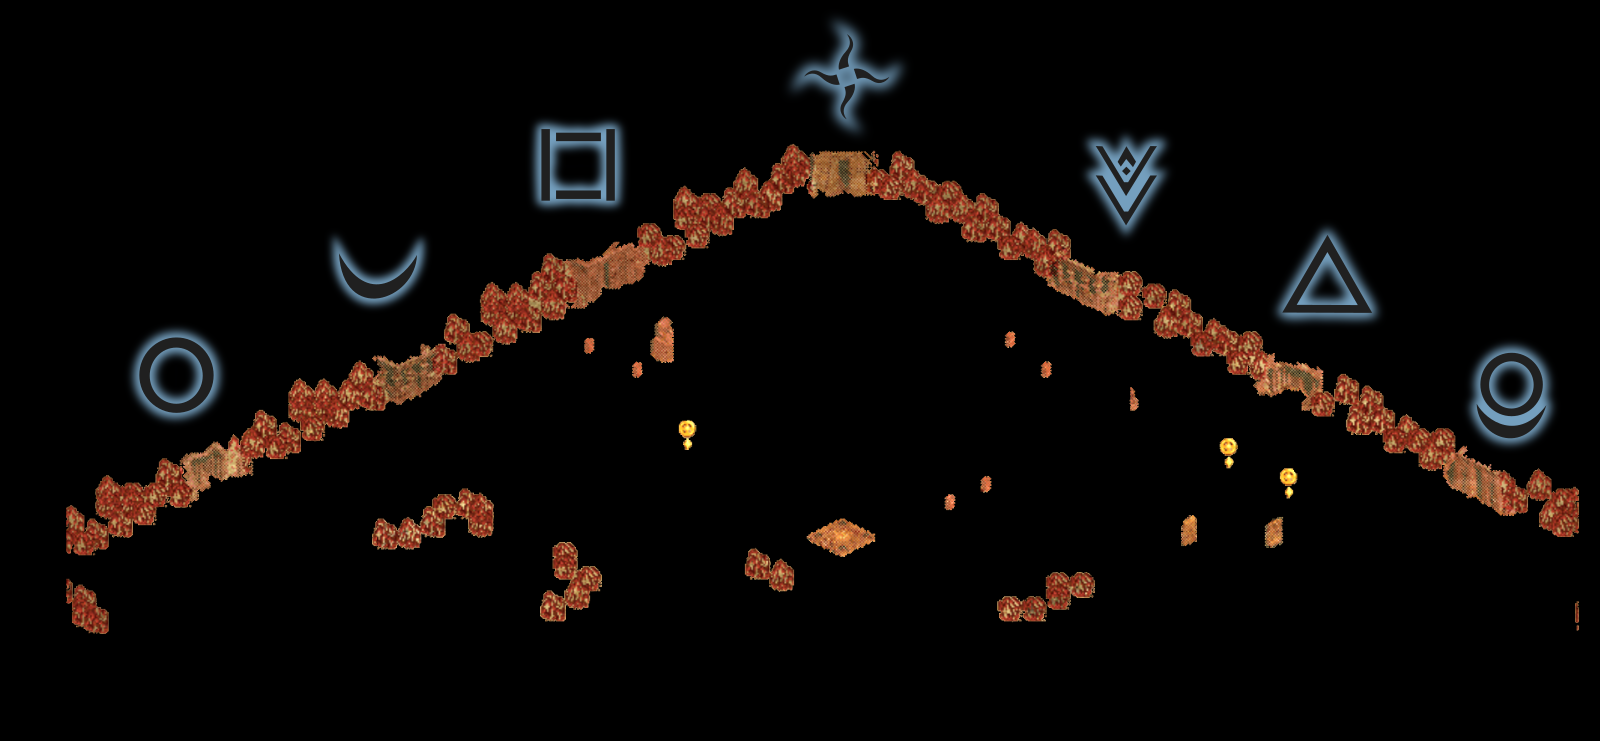
There is no reliable pattern to find the Summoner other than exploring all four ways. Note that each way has a different theme (portals, stairs, etc.) and you can run the ways first, your class is fastest with. For example, Sorcs can use Telekinesis on the portals and certain skills like fire trap don't work very well on stairs, so choose accordingly. Once you find the Summoner you can tell which symbol the true Tomb of Tal Rasha has (6 out of the 7 are floating behind him, the missing seventh is the true one):
Canyon of Magi
The Canyon of Magi uses the same layout every time and the different tombs are positioned as follows: Grab the waypoint right outside the red portal from Arcane Sanctuary if you plan on doing tomb runs.
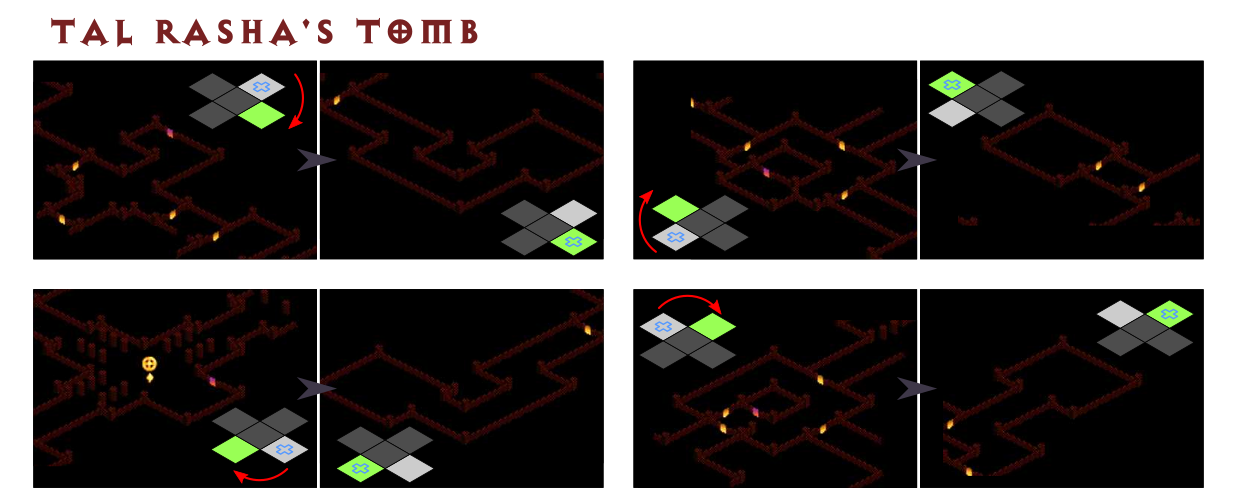
Tal Rasha's Tomb
Tal Rasha's Tomb has a reliable pattern that leads you either to a golden chest (if it is one of the false tombs) or the chamber with the orifice which you stick the The Horadric Staff in: Just like in Claw Viper Temple Level 1 you generally have to go clockwise to find the objective. Both zones share a similar theme and tile set (entry tiles can be the same but the exit/objective tiles are different).
Tal Rasha's Chamber
Tal Rasha's Chamber always has the same layout. Kill Duriel and proceed to Act III. Don't forget your Thawing Potions (they help a lot since he does cold damage).
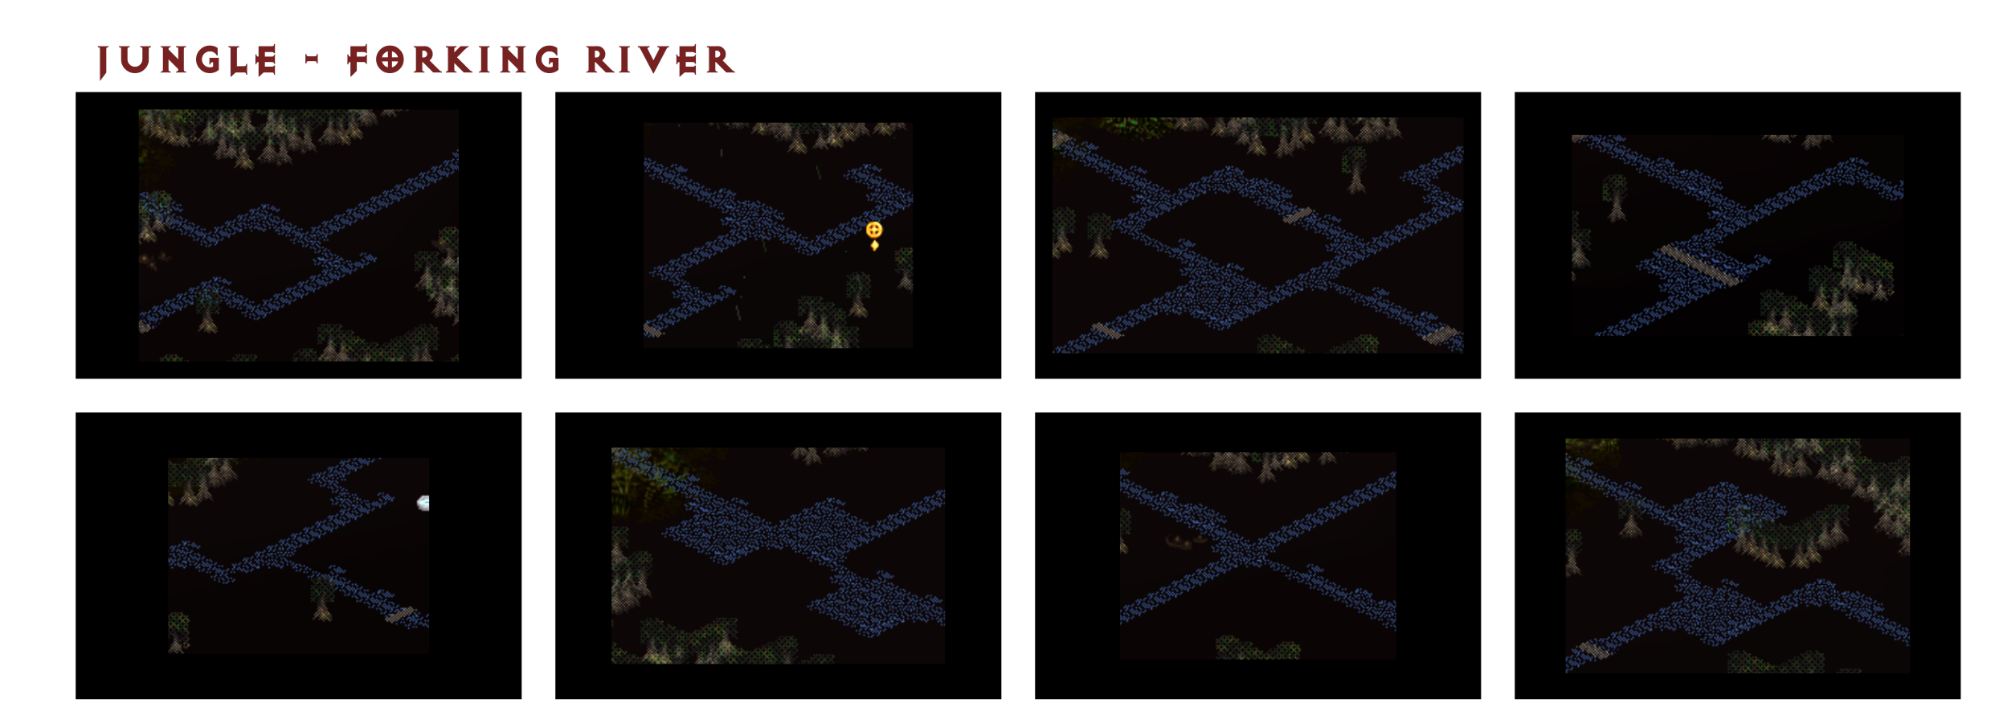
Outdoor Maps Act III, Read the River
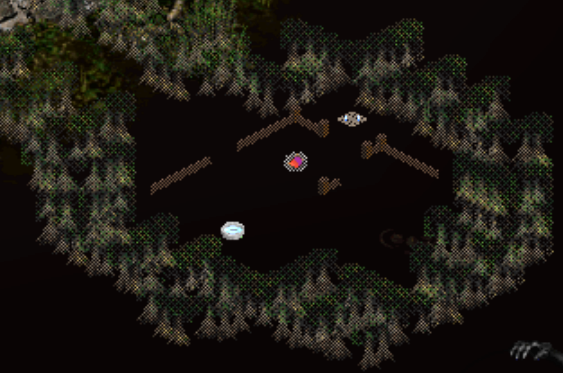
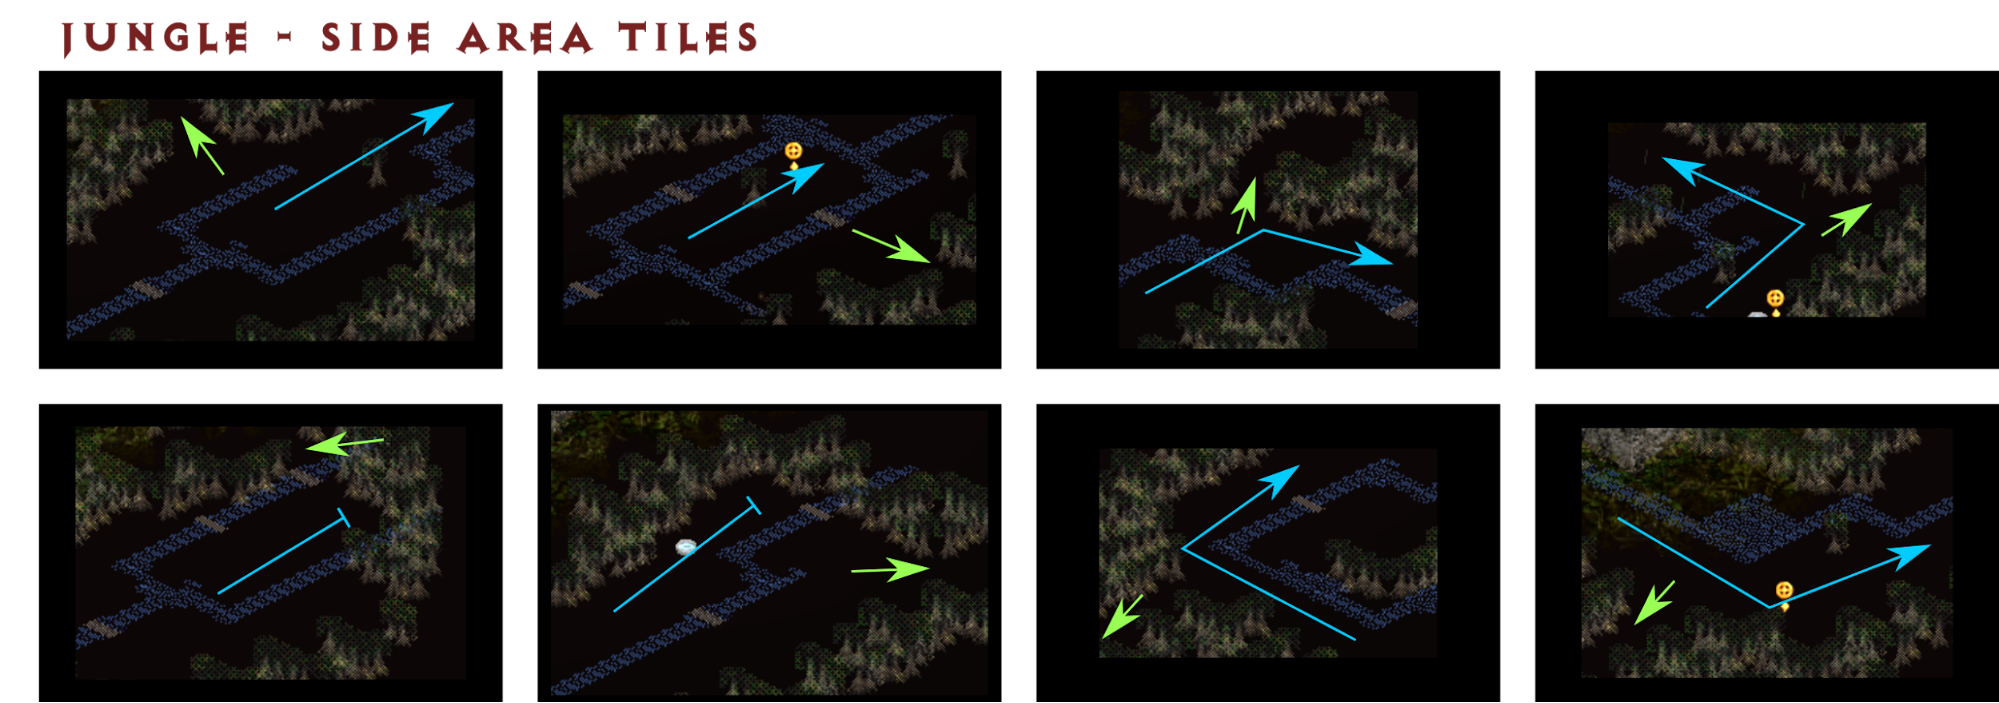
In Act III you want to get to Travincal and collect the organs needed for Khalim's Will on your way (Khalim's Eye from the Spider Cavern in the Spider Forest, Khalim's Brain from the Flayer Dungeon in the Flayer Jungle and Khalim's Heart from the Sewers accessed from Kurast Bazaar or Upper Kurast).Both the Spider Cavern and the Flayer Dungeon can be found in a side pocket area in the respective jungle zone which looks similar to this: Every jungle zone has (at least) three of these side pocket areas:Spider Forest: Spider Cavern pocket, Arachnid Lair + waypoint pocket, one empty pocketGreat Marsh: golden chest pocket, waypoint pocket, one empty pocketFlayer Jungle: Flayer Dungeon + Gidbinn pocket, Swampy Pit + waypoint pocket, one empty pocketBy closely following and watching the river you can tell where these pockets are. There are three types of river formations that indicate a passage to a side pocket area: river forks, river dead ends and river turns: There are also formations in which the river is forking in three or even four directions. These usually mark a transition into a new zone: More often than not the three-way fork continues the current zone in the same direction and leads into dead end (applies to Spider Forest and Great Marsh, dead end can be with or without a passage to a side pocket area). The four-way fork can directly lead you to the Flayer Jungle from the Spider Forest. Speedrunners refer to this as a Great Marsh skip and since there is no quest objective in the Great Marsh zone you generally want to avoid going there.Note that even a straight river can lead into a new zone sometimes and the side area pockets can connect with additional passages to other pockets or even other zones (this is another way a Great Marsh skip can happen).
Spider Forest
Take every passage to a side pocket area you see using the rules above until you find the Spider Cavern. After this your focus should be on finding the next zone, pay close attention to when the river is forking in three or more directions since that is a dead giveaway for the Great Marsh and / or the Flayer Jungle.
Spider Cavern
The Spider Cavern has a couple of fixed layouts but the chest containing Khalim's Eye is always somewhere in the bottom left corner of the map and guarded by the super unique spider Sszark the Burning (always Cursed and Extra Strong so take care).
Great Marsh
If you have to go through the Great Marsh you want to follow the main river until you find a three-way fork or the Flayer Jungle (skip all the side pocket areas).
Flayer Jungle
In Flayer Jungle you are back at checking all the side pocket areas for Gidbinn and Flayer Dungeon. Once you do find it, drop a Town Portal and continue your way along the river and beyond until you find a Lower Kurast, Kurast Bazaar or even Upper Kurast waypoint. Then get back to the Flayer Dungeon.
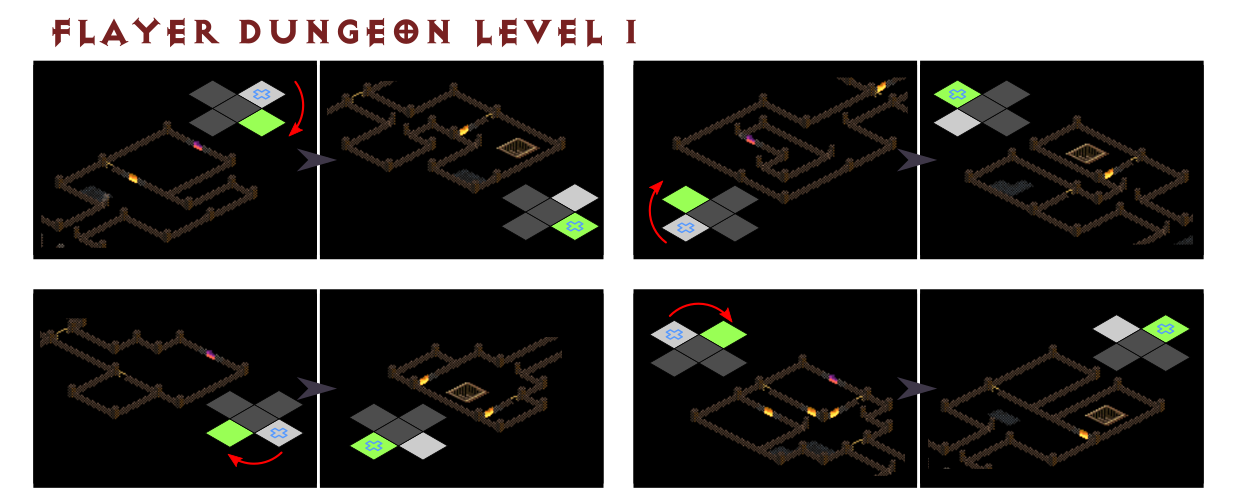
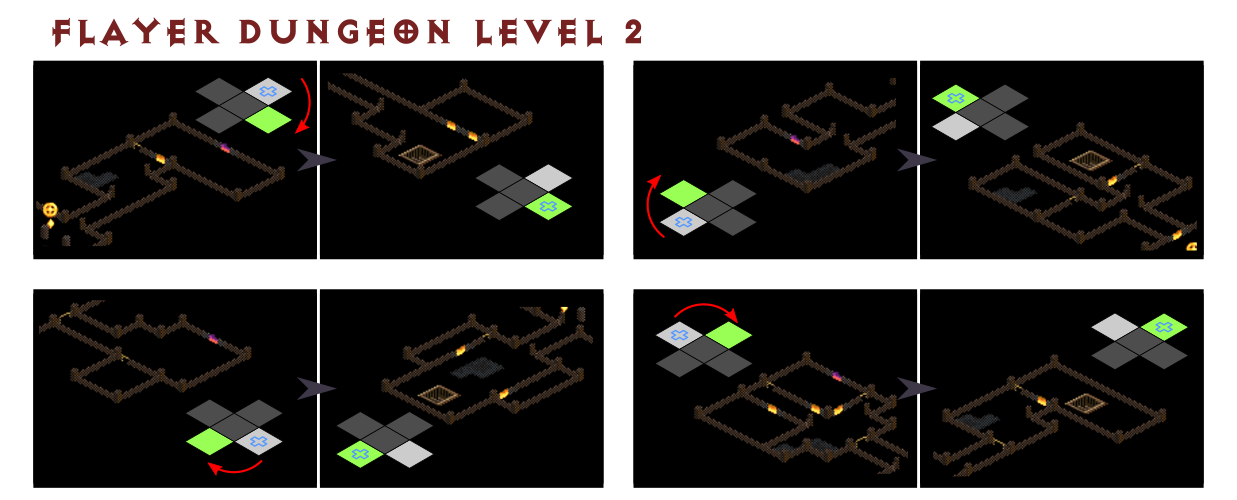
Flayer Dungeon Level 1
The Flayer Dungeon Level 1 has a reliable pattern you can follow to find the exit to Level 2 faster: You generally want to explore the Flayer Dungeon Level 1 in a clockwise fashion.
Flayer Dungeon Level 2
The Flayer Dungeon Level 2 has a reliable pattern you can follow to find the exit to Level 3 faster: You generally want to explore the Flayer Dungeon Level 2 in a clockwise fashion.
Flayer Dungeon Level 3
The Flayer Dungeon Level 3 has 6(?) different layouts that are always the same. If you imagine Level 3 as a square the chest containing Khalim's Brain is either in the middle, in the top, left or bottom corner (afaik there is no map with the chest in the right corner). With teleport you will be very quick to find the chest anyway and if you have to walk you probably have to explore most of the map anyway (considering it is built like a labyrinth).
Lower Kurast
You are mostly passing through here and looking for a waypoint.
Kurast Bazaar
If you find the Sewers (which connect the Kurast Bazaar and Upper Kurast underground) you should drop a Town Portal and go for the Travincal waypoint before you go down there to get Khalim's Heart (the last organ we need).Consider getting Lam Esen's Tome here. The Ruined Temple looks always the same (three stairs and the back of it is facing to the top right).
Sewers Level 1
The Sewers Level 1 has no reliable pattern I am aware of. If you find the golden chest tile first you can conclude the exit tiles orientation as follows:From the chest tile you want to explore the Sewers Level 1 in a counter-clockwise fashion. Note that the exit tile with the lever and super unique gloombat is mostly on the edge but can spawn in the middle of the Sewers too.
Sewers Level 2
The Sewers Level 2 is a small map and has always the layout with the chest containing Khalim's Heart in the top right. The Area also contains special chests and sometimes a unique monster.
Upper Kurast
You are mostly passing through here maybe looking for a waypoint.
Travincal
Travincal always has the same layout. You have to kill at least one of the three super unique High Council Members to drop Khalim's Flail. Complete Khalim's Will to smash the Orb and get access to the Durance of Hate. (Not sure how that works in a group, maybe someone can clarify?)
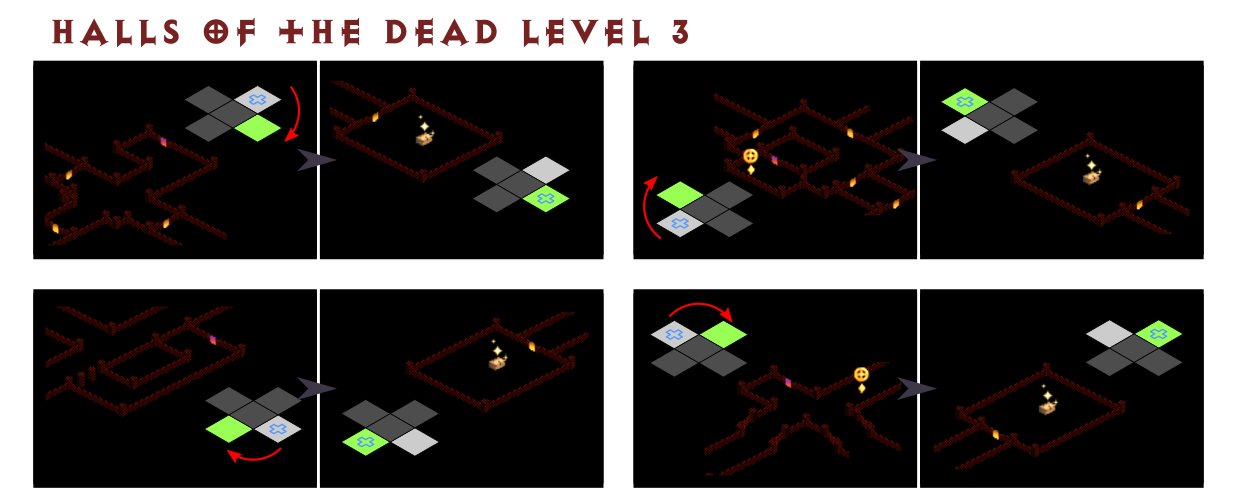
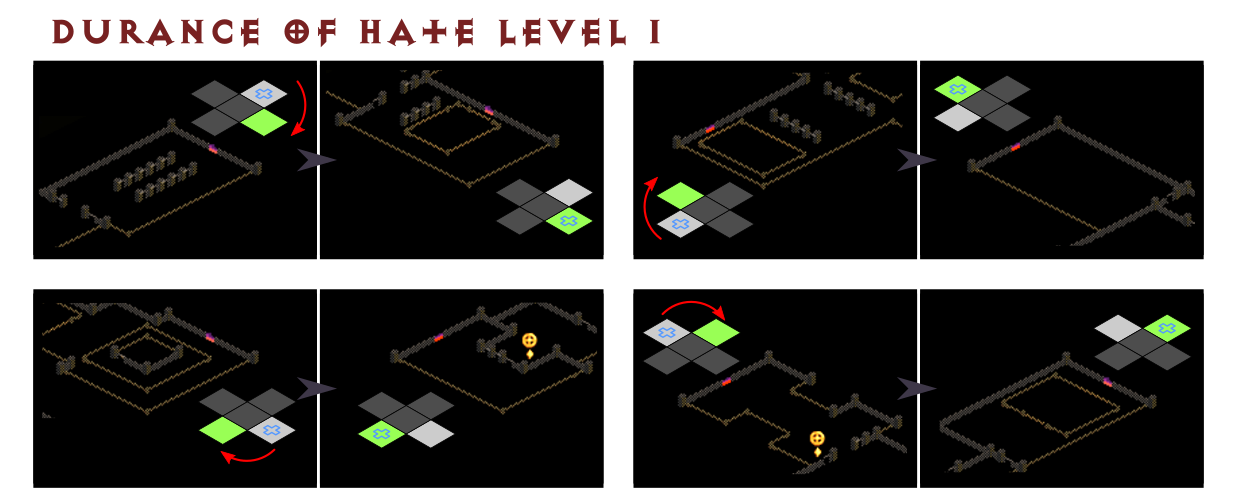
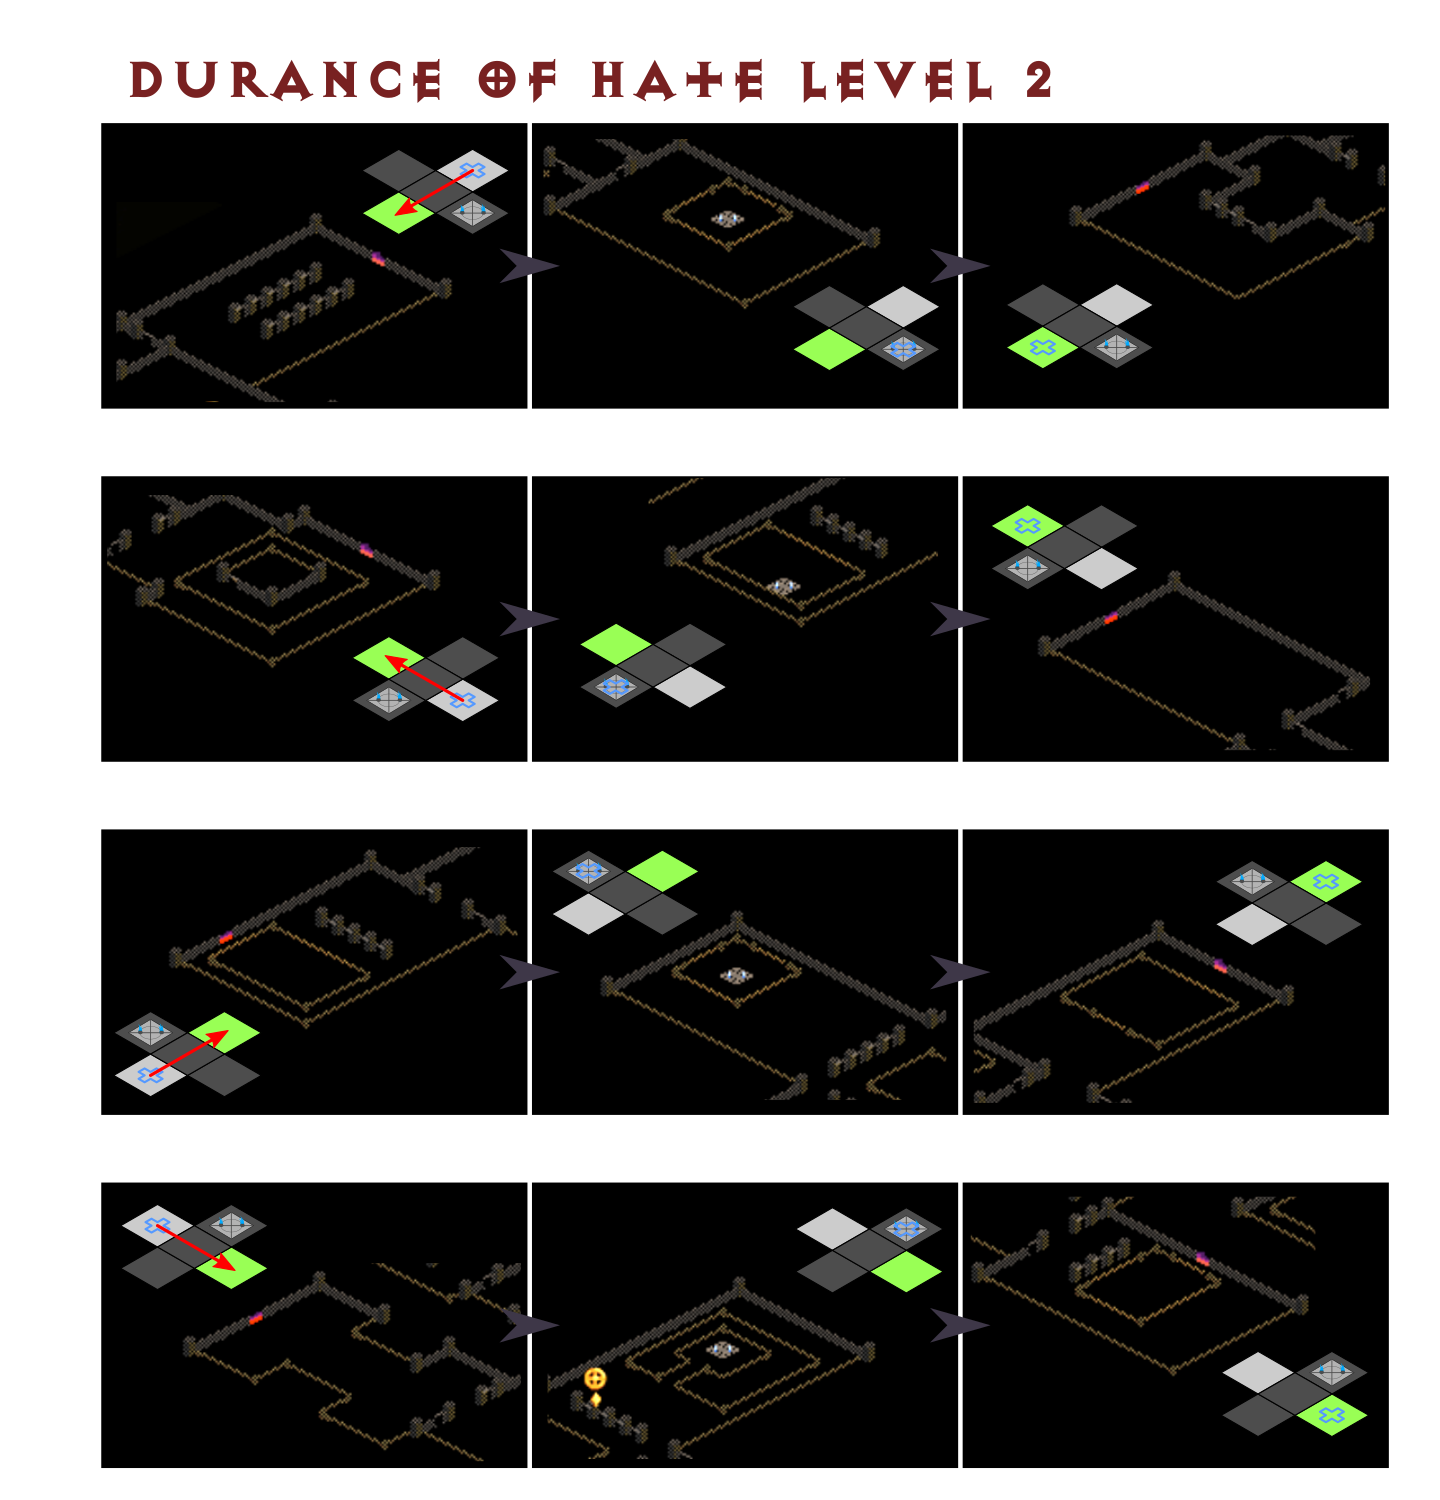
Durance of Hate Level 1
The Durance of Hate Level 1 has a reliable pattern you can follow to find the exit to Level 2 faster: You generally want to explore the Durance of Hate Level 1 in a clockwise fashion.
Durance of Hate Level 2
The Durance of Hate Level 2 has a reliable pattern you can follow to find the exit to Level 3 faster: You generally want to explore the Durance of Hate Level 2 in a straight fashion. Note that you will generally find the waypoint instead if you do a clockwise exploration.
Durance of Hate Level 3
The Durance of Hate Level 3 is home to Mephisto, kill him and proceed to Act IV through the red Portal.
Outer Steppes
Once again the outdoor maps can be thought of as squares or rectangles. The passages in Act IV however can be both near corners and in the center. The exit to the Plains of Despair can be close and quick to check from the Pandemonium Fortress: Otherwise the exit is usually located on the opposite side of the entrance and more rarely to the top right side.
Plains of Despair
Same principles apply here.Consider killing Izual for the skill point quest reward (though he's pretty beefy).
City of the Damned
Since the River of Flame entrance is always coupled with the waypoint and the waypoint can be anywhere on the grid you might have to go in serpentines with a certain space to uncover it.
River of Flame
The River of Flame (roughly) extends to the top right (of the screen) usually with only some left or right turns.If you stumble upon Hephasto the Armorer, consider killing him for the gems and rune reward of the Hell's Forge quest (highest rune that can drop on normal is Amn).
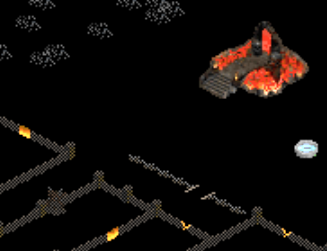
Chaos Sanctuary
has two slightly different layouts, open the seals, kill the emerging super unique monsters to spawn Diablo. Be sure to have some lightning resist on you or his Red Lightning Hose will decimate you.
Frigid Highlands
The Frigid Highlands can extend either to the top right or to the top left of the screen. By the red portals, stairs, etc. you can tell which way you have to go: Another method would be to go straight up until you hit the wall and then follow the wall.Consider rescuing the barbarians for the Ral Ort Tal quest reward from Qual-Kehk.
Arreat Plateau
Arreat Plateau follows the same principle as the Frigid Highlands.
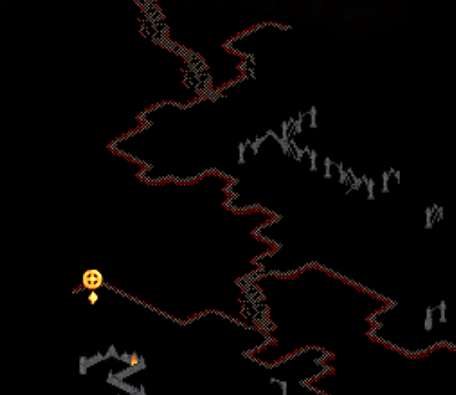
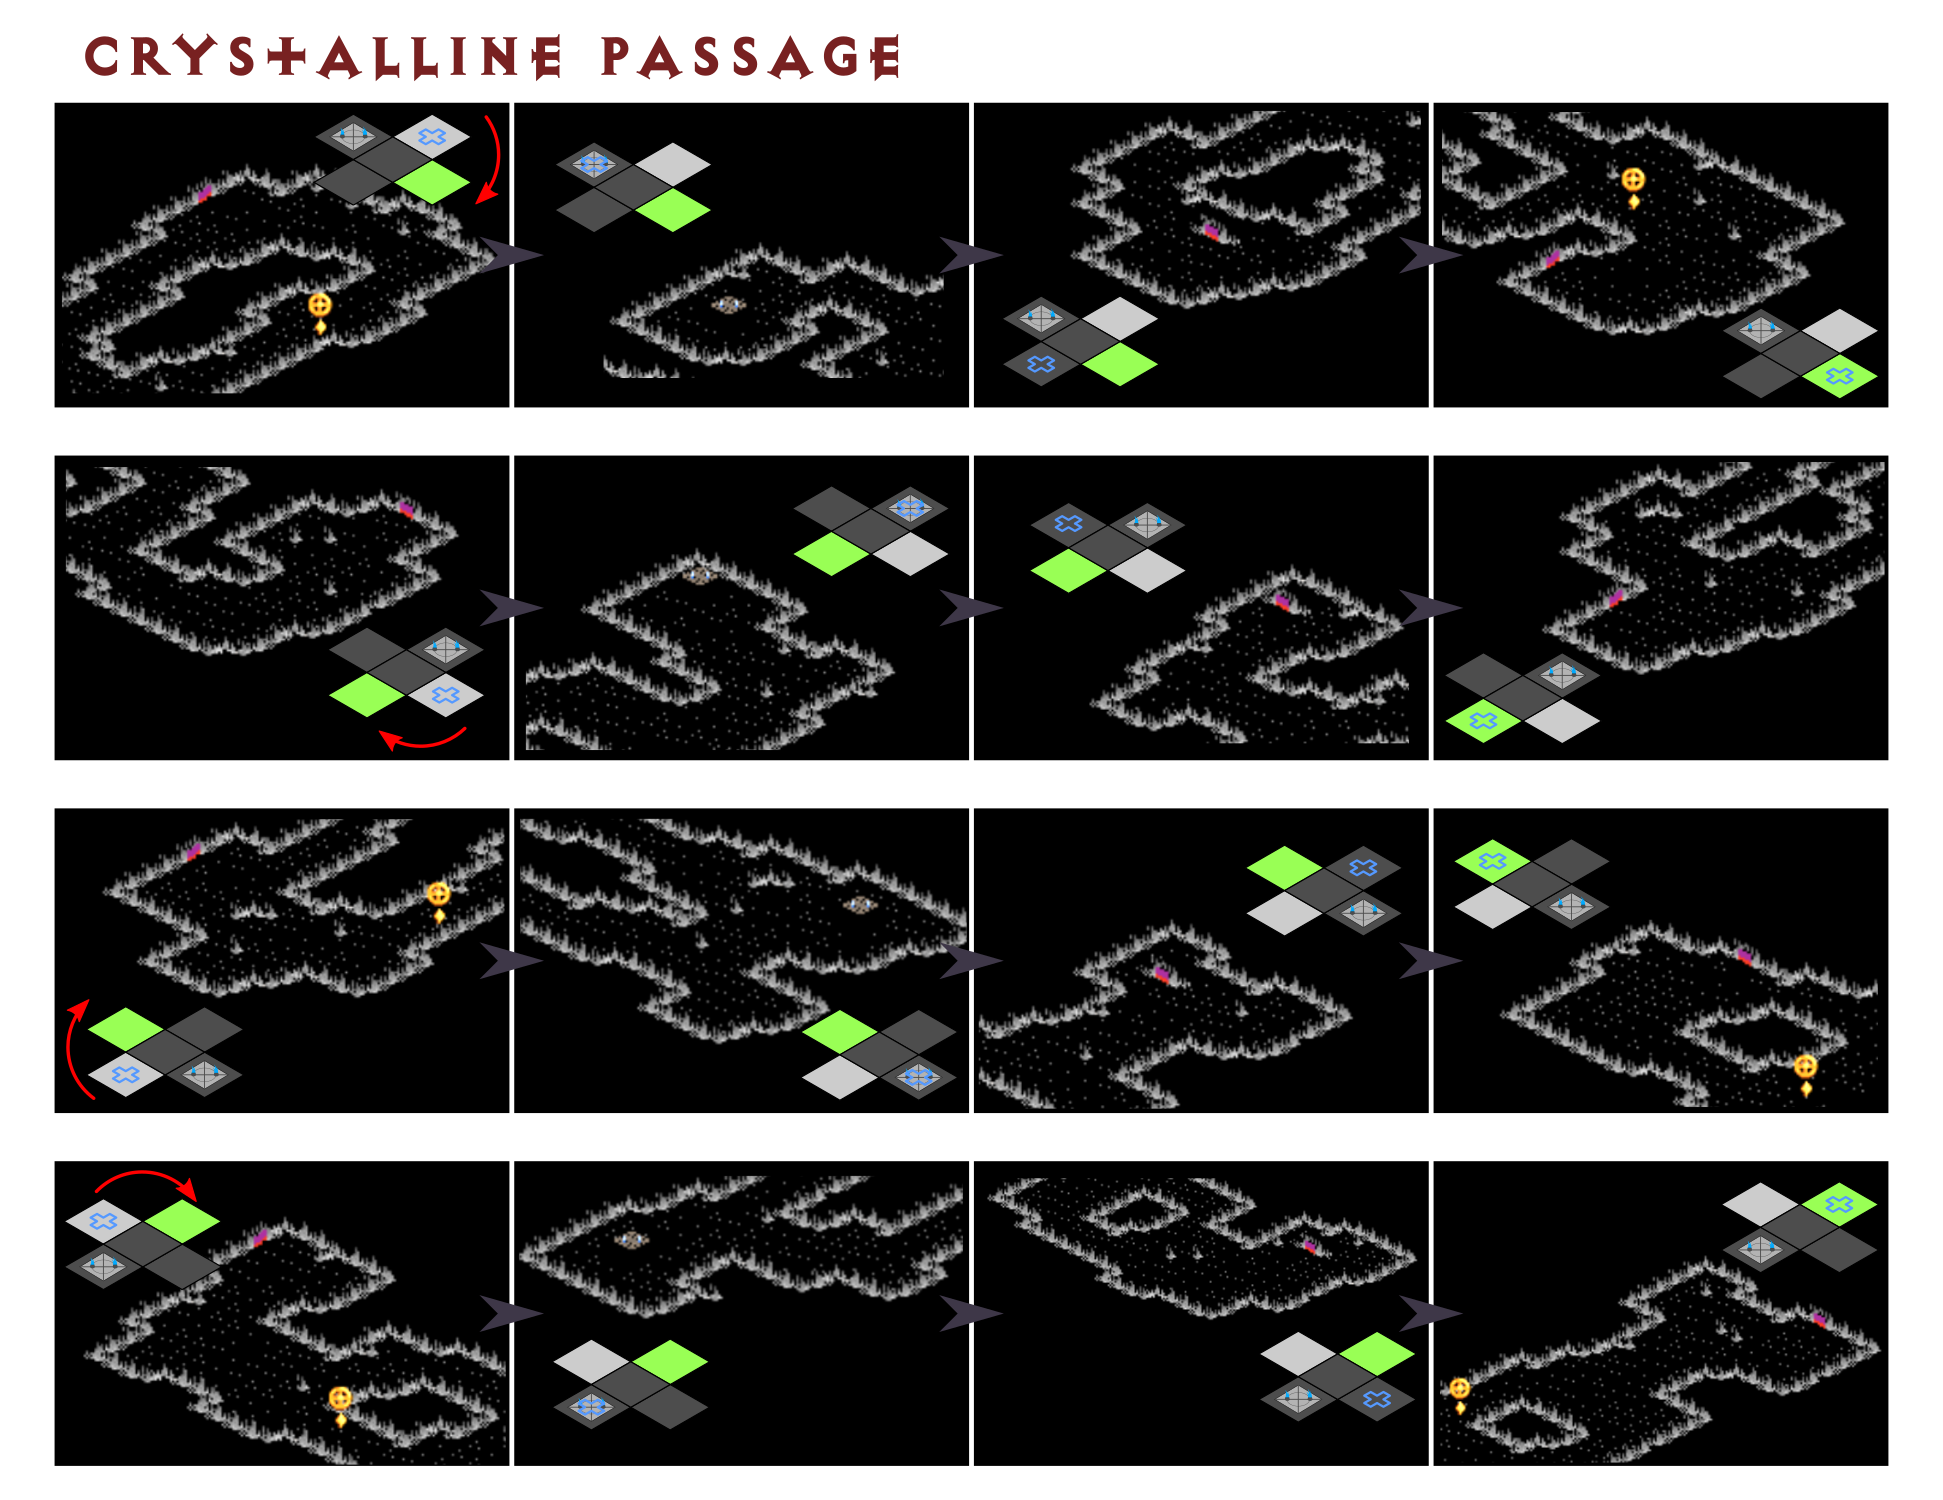
Crystalline Passage
The Crystalline Passage has a reliable pattern you can follow to find the exit to the Glacial Trail faster: You generally want to explore the Crystalline Passage in a clockwise fashion. If you want to get the waypoint you generally want to explore in a counter-clockwise fashion from the entrance instead. Or if you want to get right to the Frozen River you generally need to explore in a straight fashion.
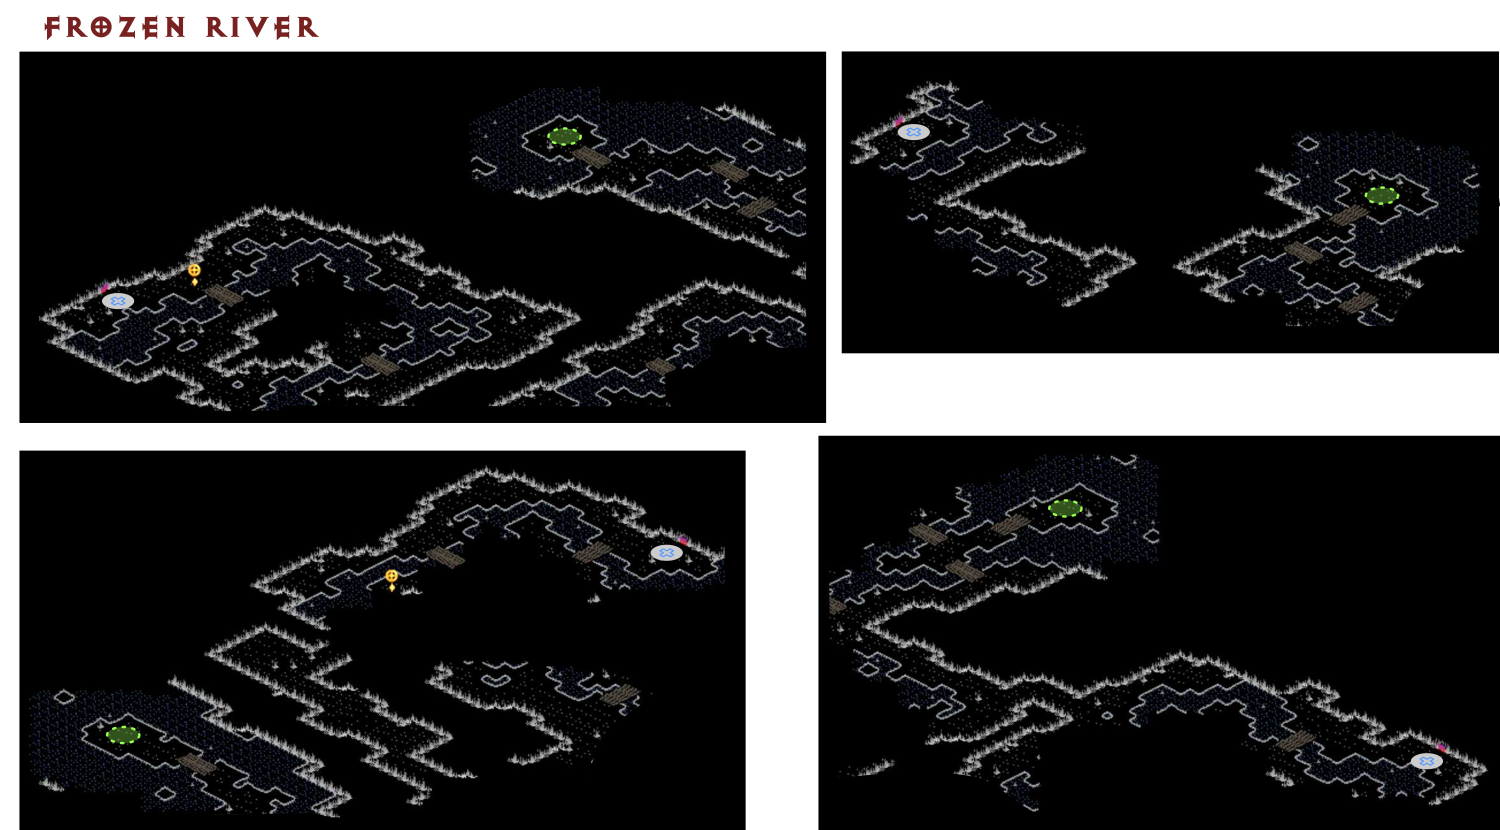
Frozen River
The Frozen River has only four different layouts which are always exactly the same: I recommend using the bridge near the entrance as a guide to find out which map you are on (e.g. bottom left map: bridge close means teleport straight to bottom left corner). The position of Anya's icy prison is marked with a green symbol. If you have teleport and find the right spots you can skip large parts of the map.
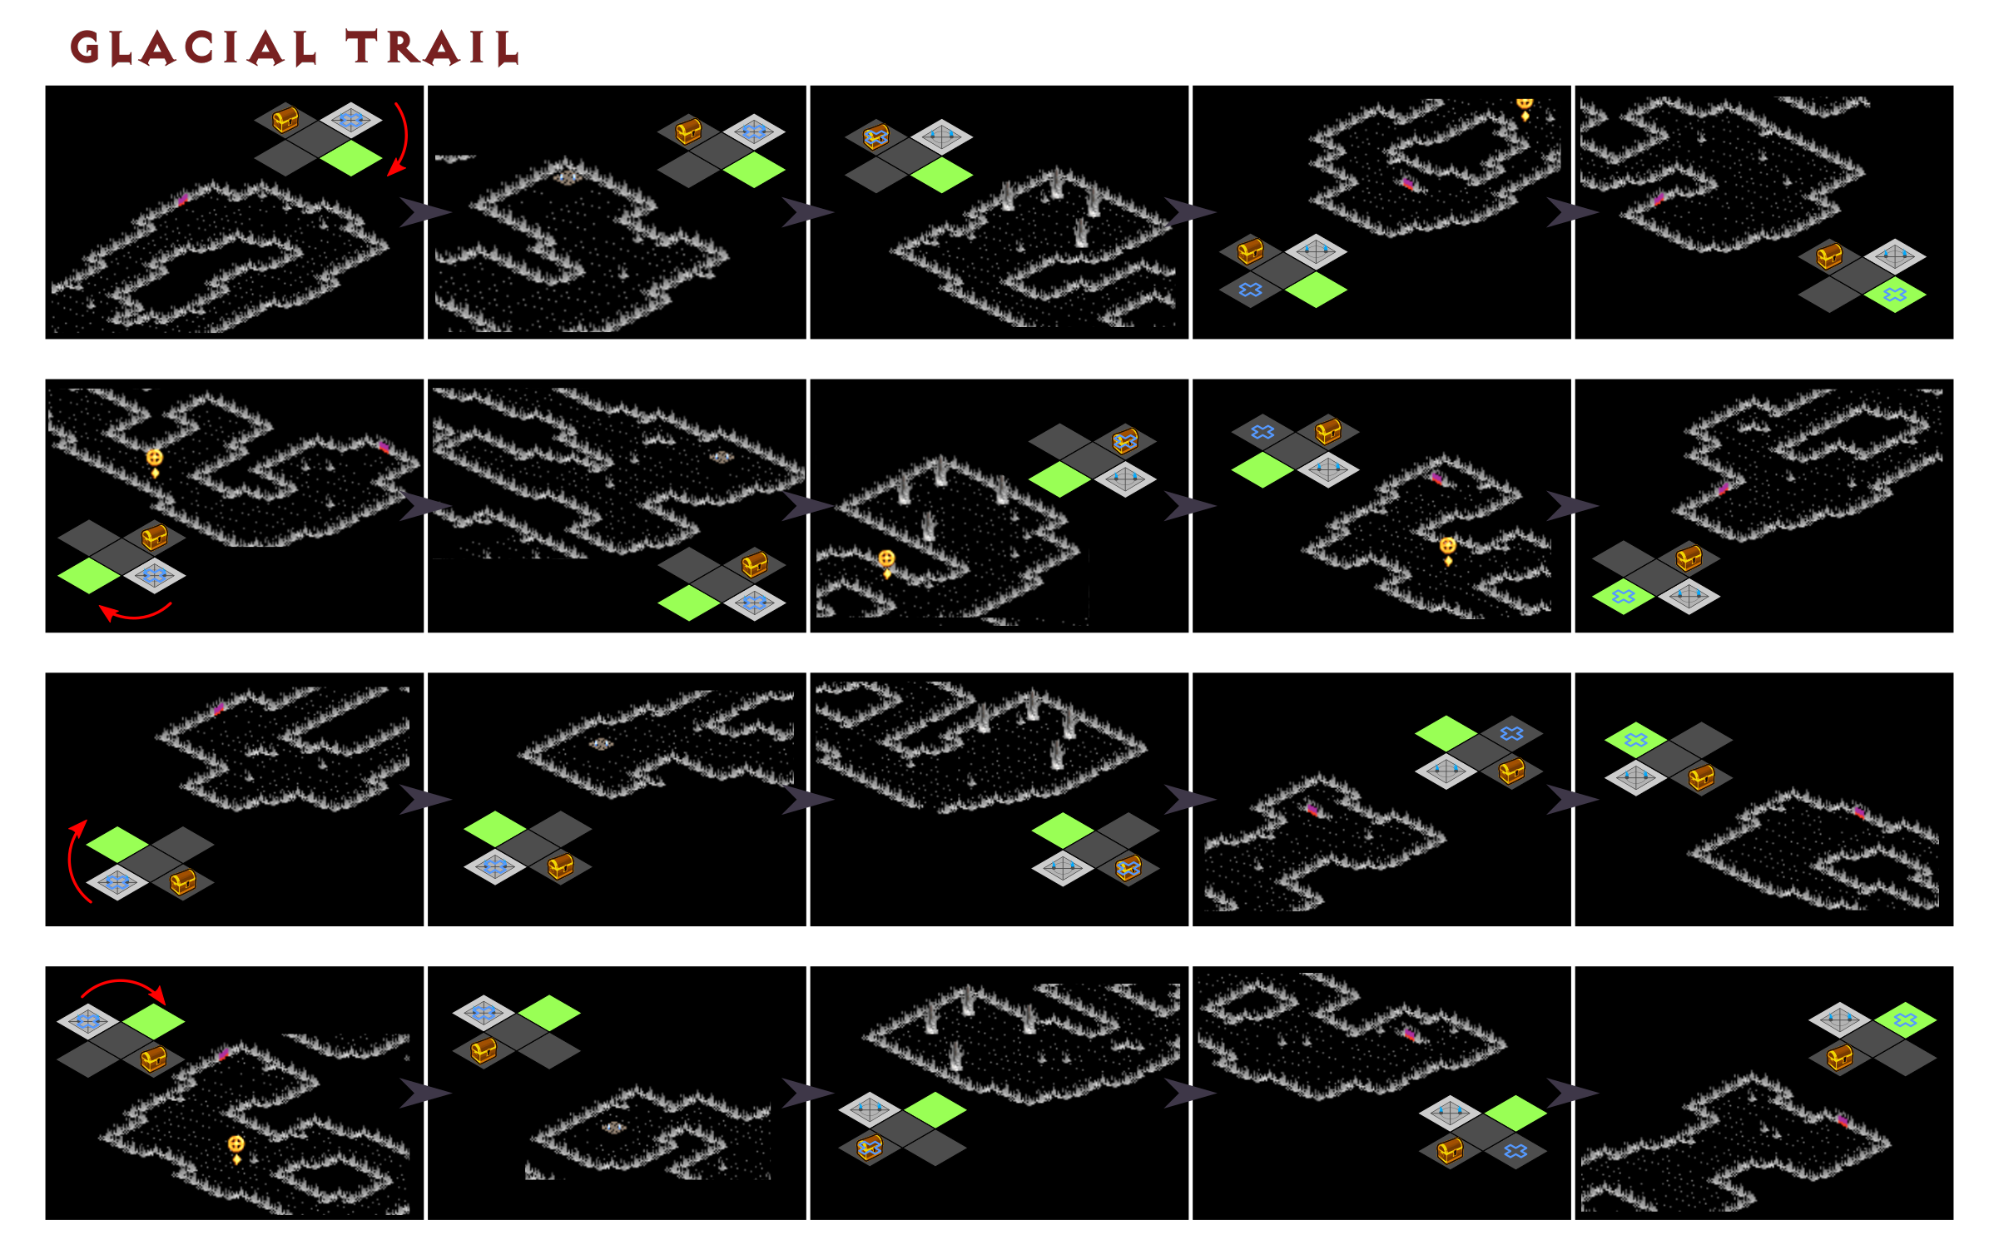
Glacial Trail
The Glacial Trail has a reliable pattern you can follow to find the exit to the Frozen Tundra faster: You generally want to explore the Glacial Trail in a clockwise fashion. The waypoint tile will always have the same orientation as the entry tile. The golden chest tile has the opposite orientation. Similar to Crystalline Passage / Frozen River you generally find the Drifters Cavern (apparently that is what it's called) if you explore counter-clockwise after entering the Glacial Trail.
Frozen Tundra
Just like the other outdoor maps in Act V the Frozen Tundra either extends to the top left or the top right of the screen. When you enter the Frozen Tundra through the Glacial Trail you can easily tell which direction to go. If you see a tree line at the bottom left of your screen you have to go towards the top right to find the cave entrance to the Ancients' Way. If you see an icy cliff at the bottom right you have to go top left instead.
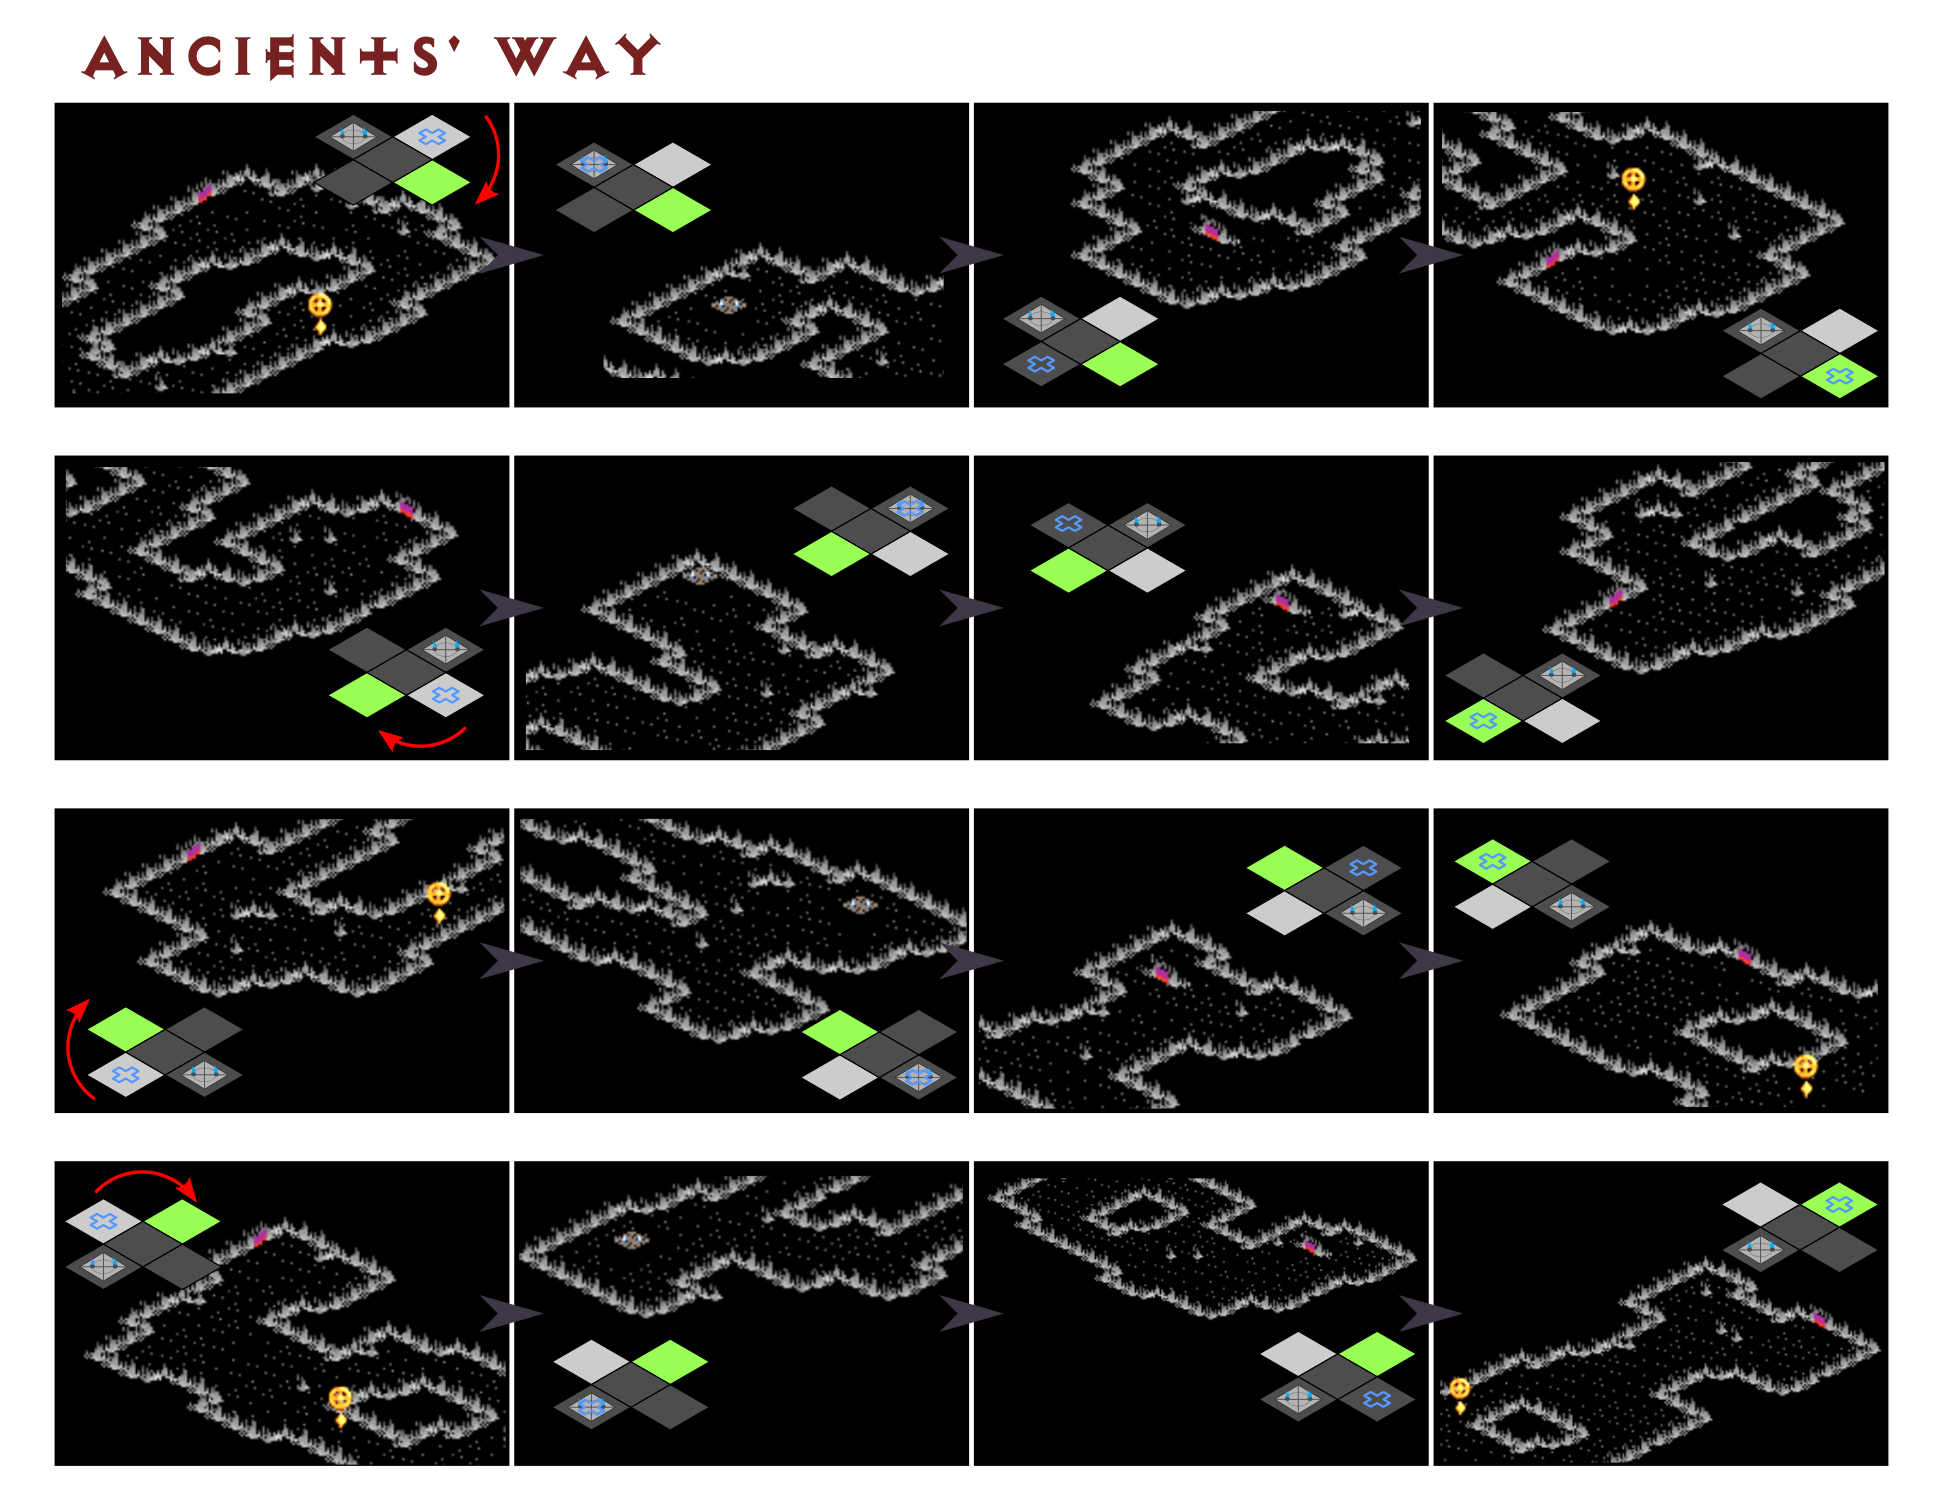
Ancients' Way
The Ancients' Way has a reliable pattern you can follow to find the Arreat Summit faster: Just like the other ice cave tilesets in Act 5 you generally want to explore the Ancients' Way in a clockwise fashion.The waypoint is generally found if you explore the Ancients' Way in a counter-clockwise fashion instead.
Arreat Summit
Arreat Summit is a small map and always has the same layout. Defeat the barbarians to prove yourself worthy and open the way to the Worldstone Keep.If you set up a Town Portal right outside the Arreat Summit party members can join / rejoin during the fight. The barbarians have random weapons so it can sometimes be worth it to reroll the fight.
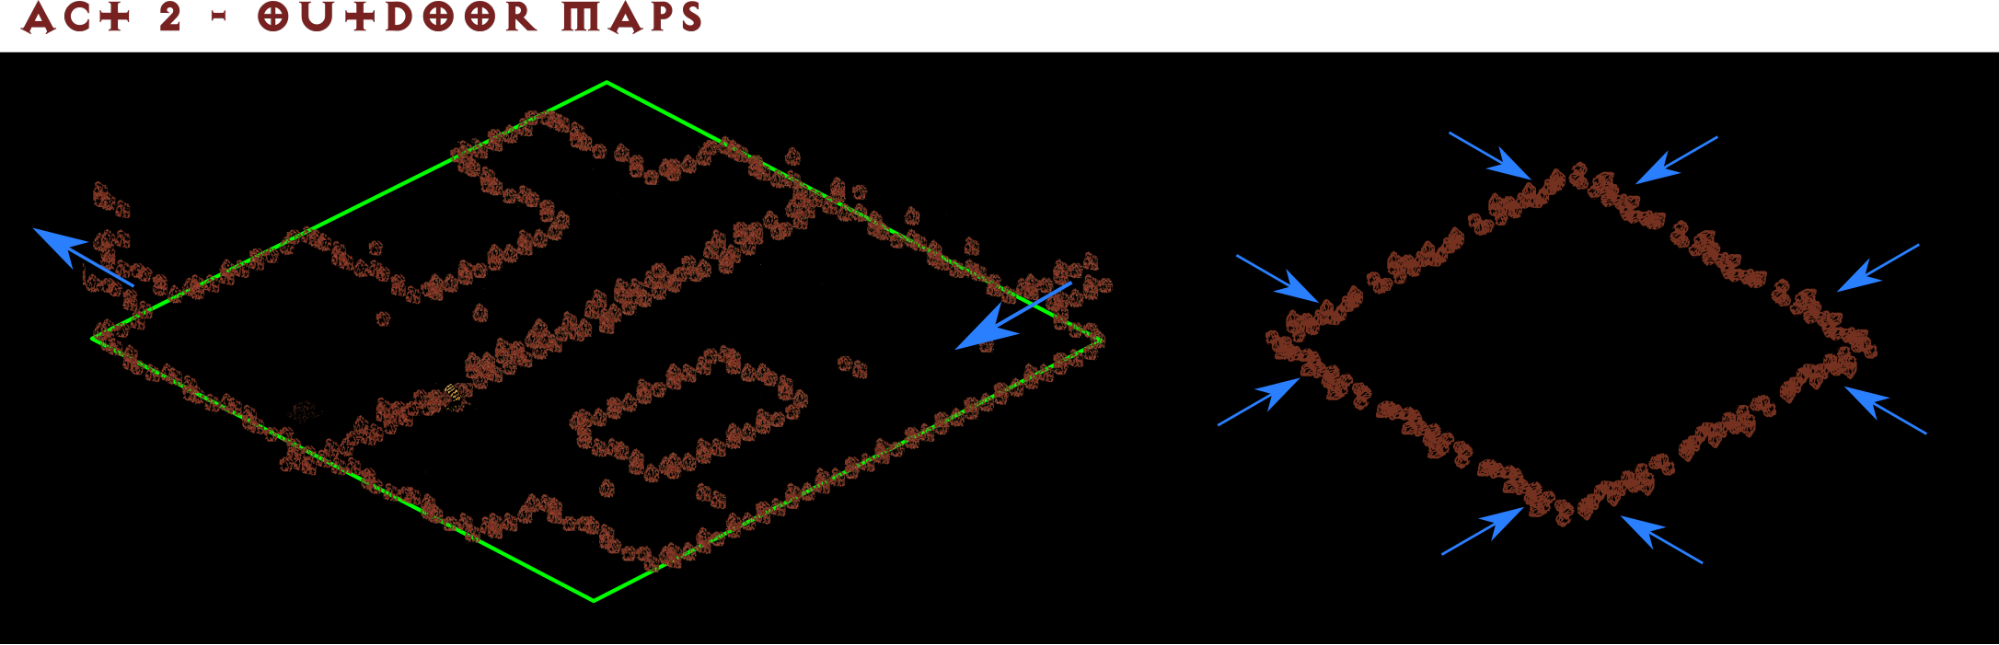
Worldstone Keep Level 1
The Worldstone Keep Level 1 has no reliable pattern I am aware of. Just like the Catacombs in Act I, it can be handy to know some of the tiles and which way they can connect.
Worldstone Keep Level 2
The Worldstone Keep Level 2 has no reliable pattern I am aware of. If you find the waypoint before the exit to Level 3 however, you can conclude the exit tiles orientation as follows:From the waypoint you generally want to explore the Worldstone Keep Level 2 in a counter-clockwise fashion to find the exit to Worldstone Keep Level 3.
Worldstone Keep Level 3
The Worldstone Keep Level 3 has no reliable pattern I am aware of.
Throne of Destruction
The Throne of Destruction always has the same layout. Kill Baal's minions (or lead them out of the throne room), follow him to the Worldstone Chamber and finish him and the difficulty.
Act I
outdoor maps: follow the roadUnderground Passage Level 1 -> Dark Wood = go straightTower Cellar = go clockwiseOuter Cloister: waypoint straight = go straight waypoint right = go left waypoint left = go rightBarracks -> Jail 1 = go clockwise / straightJail Level 1 -> 2, 2 -> 3 = go straightJail Level 3 -> Inner Cloister = go clockwiseCatacombs 2 waypoint -> Catacombs 3 = go counter-clockwise
Act II
outdoor maps: maps are squares, full-fledged corner = exit to next zoneSewers lvl 1 -> LvL 2 = enter via dockSewers lvl 2 -> LvL 3 = straightSewers lvl 3 -> Radament = go clockwiseHalls of the Dead 1->2, 2->3, 3-> Cube = go clockwiseMaggot Lair 1->2, 2 ->3 = go counter-clockwiseMaggot Lair 3-> Staff of Kings = straightClaw Viper Temple 1 -> 2 = go clockwiseTal Rasha's Tomb -> orifice room = go clockwise
Act III
outdoor maps: follow the river: forks, dead ends, turns = side pocket areas three-way / four-way forks = new zoneSpider Cavern = Khalim's Eye chest in bottom left cornerFlayer Dungeon 1->2,2->3 = go clockwiseFlayer Dungeon 3 = Khalim's Brain Chest in middle or top, left or bottom cornerSewers 1 chest room ->2 = go counter-clockwiseDurance of Hate 1 = go clockwiseDurance of Hate 2 = go straight
Act IV
outdoor maps: maps are squares, exits in corners and center of sidesRiver of Flame = go top right
Act V
outdoor maps: maps extend to top right OR top leftCrystalline Passage -> Glacial Trail = go clockwiseGlacial Trail -> Frozen Tundra = go clockwiseFrozen Tundra -> Ancients' Way = treeline go top right frozen wall go top leftAncients' Way -> Arreat Summit = go clockwiseWorldstonekeep 2 waypoint ->3 = go counter-clockwise